How to solve a Rubik's cube in the easiest way. Secrets of assembling a Rubik's cube: elements, parts, key concepts
For more than 40 years, the Rubik's Cube has sold 350 million copies across the planet and has become one of the most popular toys of the 20th century. In 1980, every fifth inhabitant of the Earth tried to solve it, and in the 2000s, robots and computer systems joined in solving the puzzle. Today there are more than 30 types of cubes.
They come in intricate shapes and levels of complexity. The 3x3 Rubik's Cube is considered classic. With his help, Erno Rubik, a teacher at the Hungarian Academy of Applied Arts and Crafts, hoped to clearly explain to students the mathematical theory of groups and the advantages of spatial thinking.
It is with this puzzle that beginners are recommended to begin their acquaintance with the Rubix family.
How the classic Rubik's cube works
The original toy with a 3x3 configuration consists of 26 cubes, which are divided into central and edge ones.In the very heart of the cube, in place of the “invisible” cube, there is a cylindrical fastening mechanism. It is connected to all external elements and is responsible for ensuring that they rotate freely relative to each other.
But there is one subtlety: the mechanism is connected directly only to the central parts. The side and corner cubes are held onto them (and each other) using special protrusions. The design of the model is designed so that only the edges can be moved. But there are no restrictions on the coordinate axes.
Rubik's Cube and God's Number
A colorful puzzle just seems like easy fun. It took the professor a month to develop an algorithm for assembling his own invention. According to combinatorics, the possible states of a Rubik's cube are 43,252,003,274,489,856,000. Translated into human language, this figure sounds like 43 quintillion. Surprisingly, this is not the limit: the value will double if we take into account the difference in the location of the central elements.
It would take a professional speedcuber 4,200 trillion years to go through all the combinations. The unattainability of the goal does not prevent fans from looking for the easiest and quick way assemblies. A new world record was set last fall by 15-year-old Patrick Pons from the USA. The teenager solved the problem in 4.69 seconds and 17 rotations.
The minimum number of steps included in the algorithm for solving a classic cube from any position is 20. It is called the “number of God.” Not everyone can play by such strict rules. On average, an experienced speedcuber makes 40 to 50 moves.
Assembly formula for beginners
 Puzzle 3x3 obeys general principle. Much depends on its condition at the time of assembly. To better understand the structure of the cube, you can disassemble it into parts and then reassemble it again. It is important to place the edges correctly.
The instructions for assembling the classic Rubik's cube consist of seven points:
- Creating a cross on the top plane
- Working with the corners next to it
- Gathering the middle ribs
- Creating a cross from below
- Working with the lower ribs
- Adjusting the bottom corners
- Final spread
English: Wikipedia is making the site more secure. You are using an old web browser that will not be able to connect to Wikipedia in the future. Please update your device or contact your IT administrator.
中文: The以下提供更长,更具技术性的更新(仅英语 )。
Spanish: Wikipedia está haciendo el sitio más seguro. Usted está utilizando un navegador web viejo que no será capaz de conectarse a Wikipedia en el futuro. Actualice su dispositivo o contacte a su administrador informático. Más abajo hay una actualización más larga y más técnica en inglés.
ﺎﻠﻋﺮﺒﻳﺓ: ويكيبيديا تسعى لتأمين الموقع أكثر من ذي قبل. أنت تستخدم متصفح وب قديم لن يتمكن من الاتصال بموقع ويكيبيديا في المستقبل. يرجى تحديث جهازك أو الاتصال بغداري تقنية المعلومات الخاص بك. يوجد تحديث فني أطول ومغرق في التقنية باللغة الإنجليزية تاليا.
Français: Wikipédia va bientôt augmenter la securité de son site. Vous utilisez actuellement un navigateur web ancien, qui ne pourra plus se connecter à Wikipédia lorsque ce sera fait. Merci de mettre à jour votre appareil ou de contacter votre administrateur informatique à cette fin. Des informations supplémentaires plus techniques et en anglais sont disponibles ci-dessous.
日本語: ? ???す るか 情報は以下に英語で提供しています。
German: Wikipedia erhöht die Sicherheit der Webseite. Du benutzt einen alten Webbrowser, der in Zukunft nicht mehr auf Wikipedia zugreifen können wird. Bitte aktualisiere dein Gerät oder sprich deinen IT-Administrator an. Ausführlichere (und technisch detailliertere) Hinweise findest Du unten in englischer Sprache.
Italiano: Wikipedia sta rendendo il sito più sicuro. Stay usando un browser web che non sarà in grado di connettersi a Wikipedia in futuro. Per favore, aggiorna il tuo dispositivo o contatta il tuo amministratore informatico. Più in basso è disponibile un aggiornamento più dettagliato e tecnico in inglese.
Magyar: Biztonságosabb lesz a Wikipédia. A böngésző, amit használsz, nem lesz képes kapcsolódni a jövőben. Használj modernebb szoftvert vagy jelezd a problémát a rendszergazdádnak. Alább olvashatod a részletesebb magyarázatot (angolul).
Svenska: Wikipedia gör sidan mer säker. Du använder en äldre webbläsare som inte kommer att kunna läsa Wikipedia i framtiden. Uppdatera din enhet eller kontakta din IT-administratör. Det finns en längre och mer teknisk förklaring på engelska längre ned.
हिन्दी: विकिपीडिया साइट को और अधिक सुरक्षित बना रहा है। आप एक पुराने वेब ब्राउज़र का उपयोग कर रहे हैं जो भविष्य में विकिपीडिया से कनेक्ट नहीं हो पाएगा। कृपया अपना डिवाइस अपडेट करें या अपने आईटी व्यवस्थापक से संपर्क करें। नीचे अंग्रेजी में एक लंबा और अधिक तकनीकी अद्यतन है।
We are removing support for insecure TLS protocol versions, specifically TLSv1.0 and TLSv1.1, which your browser software relies on to connect to our sites. This is usually caused by outdated browsers, or older Android smartphones. Or it could be interference from corporate or personal "Web Security" software, which actually downgrades connection security.
You must upgrade your web browser or otherwise fix this issue to access our sites. This message will remain until Jan 1, 2020. After that date, your browser will not be able to establish a connection to our servers.
Instructions “how to solve a 3x3 Rubik's cube” with pictures and formulas for beginners. The lightest and simple circuit, but will require attention and accuracy from you. This is the second (improved, more complete and convenient) edition of the instructions for assembling a Rubik's cube; it takes into account the wishes of our readers. The instructions are suitable for solving a Rubik's cube yourself and teaching your child.
Step 1. Solve the first side of the Rubik's cube
This step details how to solve one (first) side of the Rubik's Cube with the first belt. There are many possible options at this step, so it is difficult to describe them all. It is recommended not to memorize formulas, but to understand their essence, then you will be able to cope with any situation.
You can skip this step
If you can solve one side of the Rubik's Cube and the top belt (Figure 1-1c) without formulas or outside help, move on to .
1.1. Volumetric cross of the first side
On one side of the cube we will assemble a cross, the colors of which correspond to the central squares of the other sides (Fig. 1–1b).
Action 1. Find the appropriate rib cube (Figure 1-2) and rotate the front side to move the cube upward (Figure 1-3). Then go to step 2. Follow steps 1 and 2 required quantity once.

If the rotation “breaks” already solved cube, move the found cube to another plane (Fig. 1–4a, b). If the cube is not yet on top, go to step 1 again.
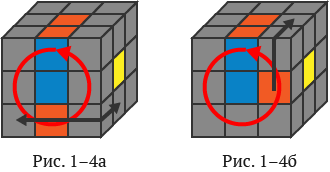
If moving to another plane will also “break” an already assembled cube, use the appropriate formula (Fig. 1–4c).
The figure (Fig. 1–4c) shows only one of the possible options - proceed by analogy.

Action 2. When the found cube is moved up, use one of the formulas.


1.2. Side and belt
To arrange the corner cubes and complete this step (Figure 1-1c), you will need the following formulas.


To remove an irregular corner cube, use formulas.


If the cube is “hidden” at the bottom, then we move it to the lower belt, so that we can then move it to its place using the formulas above.

Step 2. Assemble the second belt
The second belt is easily assembled using two formulas. Find a suitable cube in the third belt so that both colors match (twist the third belt if necessary), and move it diagonally to the second belt using the formulas.
Formula: (N’P’NP)(NFN’F’)

Formula: (NLN’L’)(N’F’NF)

If there is no suitable cube
If there is not a single suitable cube, using the same formulas, move any cube from the third belt to the second - the desired cube will appear.
Step 3. Cross on the opposite side
Now you need to assemble a cross on the opposite side of the Rubik's cube. The cross is assembled without taking into account the colors of the third belt (Fig. 3-1). In other words, at this step only the cross is assembled, and the cross is coordinated with the colors of the third belt at the next step.

Your Rubik's Cube now has one of four combinations: a, b, c, d - see Fig. 3–2. The transition from one combination to another occurs using a single formula: F P V P" V" F". You need to repeat this formula 1-3 times, depending on what combination you have.
If the cross is already assembled (Fig. 3-2d), skip this step. If you only have one center square (Figure 3-2a), then you need to repeat the formula 3 times. If the angle (Fig. 3–2b) - 2 times. If the line (Fig. 3–2c) - 1 time.

Formula: F P V P" V" F"
Please note
Before each execution of the formula, the Rubik's cube must be positioned exactly as shown in the pictures.
Step 4: Coordinated Cross
As a result of this step, we will get a cross that matches the colors of the belt (Fig. 4-2c).
Rotate the top belt until the 2 colors of the cross match the middle squares of the top belt (Figure 4-1). Only two combinations are possible: the colors match the line Fig. 4–2a) or the colors coincide at an angle (Fig. 4–2b).

Formula when the line matches: P V P" V P VV P"
We move the incorrectly placed cross cubes located opposite each other (two opposite ends of the cross).

After completing this formula, rotate the top belt again until the 2 colors match the middle squares of the top belt (Figure 4-1). Please note that even now the two ends of the cross will not fall into place, but the combination will change to “colors coincide at an angle” (Fig. 4-2b).
Formula when the angle coincides: P V P" V P VV P" V
We swap the incorrectly placed cross cubes, located diagonally relative to each other (two adjacent cross cubes).

After completing this formula, the cross will be assembled and its side colors will match the colors of the upper belt (Fig. 4-2c). If the result is not achieved, then repeat this step again, first orienting the cube correctly.
Step 5. Arrangement of corner cubes
Corner cubes are arranged using two formulas. After applying these formulas, the corner cubes will remain in place (in their corners), but may not be rotated correctly. In Fig. 5–1, a black dot marks a cube that is placed in its place (in its corner), but turned incorrectly. The cubes are unfolded in the next step.

Right turn formula: (P’F’L’F)(PF’LF)

Left turn formula: (F’L’FP’)(F’LFP)

Step 6. Rotate the corner cubes
The reversal of all corner cubes is performed by the simple formula P'N'PN, performed many times. Before you begin, please read the entire section thoroughly and make sure you have no questions.
Please note
After starting to execute the formula, the Rubik's cube will “collapse” and will finally be solved only after all the corner cubes have been correctly deployed. In other words, all the corner cubes are unfolded in one operation, which will require your attention and endurance.
Let's find the corner cube that needs to be rotated (counterclockwise or clockwise - it doesn't matter), see Fig. 6–1.

Take a Rubik's cube as shown in the picture below and complete the formula.
Please note
1) The formula (of 8 moves) must be performed 1 or 2 times until the corner cube turns over to the correct position (Fig. 6-2b).
2) When the corner cube rotates to the correct position, the Rubik's cube will "collapse" - don't worry, the Rubik's cube will only be solved when you are done with all the corners.
3) Do not change the position (do not turn over) the Rubik's cube in your hands until the end of this step.

When the first corner cube is already correctly positioned (Figure 6-2b), rotate the top layer (Figure 6-3a) so that the next corner cube moves to the upper right corner (Figure 6-3b). If the next corner cube is already turned correctly (does not require turning), rotate the top layer one more time (Figure 6-3a).

Again perform the 8-move formula (1 or 2 times) and follow all the above recommendations. These steps must be repeated until all the corners are turned correctly - until the Rubik's cube is completed.
I wish you patience and success!
Support the site
If the article helped you, please help us develop the site. Thank you!
Surely each of us is familiar with Ernő Rubik’s Cube, or as it is commonly called in common parlance, “Rubik’s Cube”. Oh, how much nerves and time we spent trying to figure out how to assemble this tricky cube to get all sides the same color. It turns out that there are whole schemes for collecting this “beast”, which we will tell you about now.
Before you start assembling the cube, you need to understand what elements it consists of. Like all ingenious things, the cube is simple. The most popular cube among ordinary people is the 3x3 cube, consisting of 12 edges, 6 centers and 8 corners. There is a cross inside the cube, thanks to which the faces of the cube move. The crosspiece is not movable and does not take part in the assembly.
Each center of the cube is painted a certain color, which indicates what color the side will be when assembled. The centers of the cube are not movable and they do not change their position during the assembly of all the elements.
The ribs are always painted in 2 colors. This is a solid element and cannot be broken by rotating the faces.
The corners of the cube are painted in three colors, which also do not separate when rotated.
This is how all 3x3 cubes are designed, and it doesn’t matter whether it’s high-speed or bought at the market in the nearest tent.
Scheme for assembling a 3x3 Rubik's cube for children, step-by-step instructions for beginners (the simplest method)
To understand the formulas that are used to assemble a cube, you need to become familiar with the language of rotations. These special designations for the movements of the faces of the cube, with the help of which one or another assembly algorithm is written, will help you achieve heights in assembling the cube.

There are also designations for changes in the position of the cube in space, they are called interceptions. 
If in the prescribed algorithm only the letter (R) is indicated, then the position of the cube changes clockwise. If the designation contains a letter paired with an apostrophe (R’), then the side changes counterclockwise. If there is a number after the letter, this means that the side needs to be rotated the same number of times.
Initially, it is worth assembling the correct cross. Choose any center color and start assembling.
If the color of the center and edge stickers match, you have assembled the correct cross.

Place the center at the top, in our case it is white. We find 4 edges of the same color, select any of them and put them first. If the edge is in the middle layer, then using the L’ or R movements we move them to the white layer. Below are different situations and their solutions. 
This way you will get a cross. Most often at this stage it will not turn out right, so you need to change the ribs in places. Twist the top layer until the 2 edges match the center color. At this stage, you may find yourself in one of two situations (shown in the picture).
The R U R’ U’ algorithm is also called bang-bang.

Now you need to fold the first layer. To do this, find a white corner (you will have a corner of the color that you chose at the first stage), find the place on the bottom layer where it should be, put the corner in its place. The picture below shows three standard situations that you may encounter. After following the algorithm from the picture, you can put the corner in its place. 
We find 4 ribs (except for the yellow one). On the top layer, select the one you want to put first, then rotate the top edge until the color of the center matches the sticker of this edge. Next you will get one of the situations.

Collecting the yellow cross. Please note that sometimes when carrying out the manipulations above, a yellow cross may appear on its own. If this does not happen, find your situation and the algorithm for solving it in the picture below. 
Next, we collect the entire yellow side. After collecting the yellow cross, one of the 7 situations described below may appear. Find yours and perform revolutions using the specified algorithm. 
We collect the corners of the top layer. Select any of the corners and use U, U2 and U’ movements to put it in place so that both corners match the color of the lower layers. Take the white cube to you and do one of the indicated algorithms. 
At this stage, some difficulties may arise:
- the corner fell into place along with another corner. Rotate the top face of the cube so that it stands as in the algorithm indicated above;
- the corner fell into place along with another corner diagonally. The output is exactly the same as above.
All that remains is to put the ribs in their places. Look at the picture to see what situation you have and follow the algorithm to assemble the ribs. 
Voila! The cube has been completed.
How to solve a Rubik's cube in 20 moves, diagram?
Over more than 40 years of the cube's existence, a considerable number of schemes have been invented. The most digestible and simple method is considered to be layer-by-layer assembly. It consists of seven stages, which are depicted and described in the diagrams we provided. You may have to spend a fair amount of time collecting for the first time than you expected. However, you can solve this puzzle yourself or together with your child.
To begin with, you must understand that when solving a cube for the first time, you will not be able to achieve speed in a matter of seconds. In the assembly, the main thing is to understand how the edges move correctly in the plane and learn to determine their location. The simplest way, which should be used in the first couples, for children and adults, begins with assembling a cross on the top edge. 


The principle of the starting cross assembly method is simple. To do this, you need to study the instructions we provide and the location of the edges. 


At the sixth stage, it is necessary to send the corner cubes of the third layer to their places. 
At the final 7th stage, you need to expand the corner cubes of the third layer.
Scheme for solving a 3x3 Rubik's cube in 15 moves
Just 7 years after the invention of the Rubik's cube, competitions began to take place. high-speed assembly. Fans of this puzzle began to develop algorithms and strategies that would allow them to solve the cube in a minimum amount of time and moves. Today, there is only a single algorithm for solving a cube in a minimum number of moves, and it is called the “God Algorithm.” Accordingly, it is impossible to solve the cube in 15 moves. 
Video for beginners on how to solve a 3x3 Rubik's cube
How to quickly solve a Rubik's cube 3x3 quick assembly scheme?
Assembling the cube takes a long time. Beginners in this business often wonder how to quickly assemble a cube and not waste time learning formulas. The whole process quick assembly begins with the collection of the lower cross. Next, according to the diagram that we have posted below, collect the cube. 
Maxim Chechnev, how to solve a Rubik's cube?
On the Internet you will find a huge number of manuals on techniques for solving the simplest Rubik's cube. The methods of learning on the World Wide Web are not much different from one another, but there is a catch - not all of them are understandable and accessible, especially for children. After re-reading complex formulas, the child is unlikely to understand anything and will be able to assemble his first puzzle on his own.
A simple and accessible way of learning was invented by Maxim Chechnev. He became convinced that his training scheme works for children by working in children’s camps and teaching children there different ages solve a rubik's cube. 
The learning and assembly process will take your child several hours. Below you will find video materials consisting of 9 lessons. It is always easier for children, as well as adults, to understand how assembly takes place on clear example rather than trying to parse already complex formulas. In the end, the children will not only assemble this puzzle on their own, but will also remember all the stages of its assembly.
Jessica Friedrich, how to solve a Rubik's cube?
Back in the 80s of the last century, another method of solving a Rubik's cube was invented by a Czech resident, Jessica Friedrich. This method is layered and the cube is assembled accordingly in layers. This technique was developed for beginners, but it has been improved. The thing is that Friedrich proposes to reduce the number of stages from 7 to 4. Initially, a side is selected and a cross is assembled on it, then the first and second layers are assembled at the same time, and only then the last layer, for which 2 stages were allocated. However, this method is by no means simple. Despite the reduction in steps, you will have to learn as many as 119 algorithms.
Experts do not recommend that beginners begin learning how to assemble a cube. First, you should master the simplest layer-by-layer technique, improve your collection skills to at least 2 minutes, and only after that proceed to the Friedrich method.


Professional Rubik's Cube
You may be surprised, but there are competitions in the world for the speed of solving a cube, and only aces take part in them. Cubes for speedcubing are selected especially carefully. First of all, they must be fast. Today there are a huge number of cubes from various companies on the market. Among professionals, cubes from the following companies are valued: QiYi, MofangGe, Valk, MoYu and others. 
The cost of the cube depends on the manufacturer and the materials from which it is made. By the way, most of the companies we listed above are Chinese. You can also buy them in Chinese trading platforms, including on . Average cost A quality cube on Ali will cost 500-700 rubles, which is an order of magnitude cheaper than in local stores.
How to lubricate a Rubik's cube?
It may seem strange to you that the cube needs to be lubricated at all. Only a purchased cube always spins well and it won’t even occur to you that it needs to be lubricated. As time passes, the cube may begin to creak, the sides may begin to rotate with tension, and much more. To troubleshoot, you will have to lubricate the cube. If you have just begun your first steps in mastering the cube, then you are unlikely to need a professional lubricant that is sold online. It is quite possible to get by with other cheaper methods. In this case, inexpensive silicone grease is perfect. It is sold in all radio parts stores. Buy two versions of this lubricant (consistency like water and like jelly), mix and lubricate the cube if necessary 
Although the process of solving Erno Rubik's cube at first glance seems to be something complicated and incomprehensible, even a child can cope with it. The main thing is to have a great desire to spend your time learning this exciting process.
Date: 2013-02-13 Editor: Zagumenny Vladislav
How to solve a 3x3 Rubik's cube worries many today.
There is the most common and difficult method for quickly solving a Rubik's cube, the Jessica Friedrich method, also known as CFOP.
The name of the method is an abbreviation made up of the first letters of the four assembly stages used in the method: Cross, F2L, OLL, PLL.
It consists of assembling a kind of cross of four edged cubes on one of the faces of the Rubik's cube. The stage is not difficult for those who have at least some practice in assembling the cube, but still, it takes some time, especially for the unprepared.
Professionals often use the main assembly trick - relativity. In other words, if you assemble a cross on a white edge, the white-blue cube is already on it in white towards the center of the white edge, this means that its connection with the blue edge is not so important, you should just put a white-green one on the opposite side of the cube cube, and on the left and right - white-orange and white-red. Then you can rotate the white edge in any way, and at the end, in one motion, connect the side centers with the “cross” cubes. To successfully carry out this inherently simple operation, you need to remember the order of the colors on the cube clockwise - blue, red, green, orange.
F2L (first two layers)

This is the longest stage. The main thing here is to completely assemble the layer with the cross and the intermediate layer. This is done like this: we put eight cubes - four corner cubes for the bottom layer, and four side rib cubes for the middle one - in place. A column consisting of corner and edge cubes, unlike methods for beginners, here should be assembled immediately. There are about 40 ready-made algorithms for this; you can use any of them, or trust your own intuition.
A pair can also be collected in just three movements:

The stage is complicated, first of all, by the need to be able to find paired cubes. There are a total of 16 positions in which these cubes can be found - 8 positions in the last layer, 8 positions in the columns. Without some training and an idea of the correct search for cubes, the stage can take quite a long time, however, pros cope with it in a matter of seconds thanks to a trained eye and basic finger memory developed by long sessions.
OLL (Last Layer Orientation)

The point of this step is to orient the cubes of the last layer so as to assemble the last (yellow) face. This is done in a minimum of 6, maximum of 14 moves, using any of the 56 known algorithms, each of which is applied according to a specific current situation. Of course, learning 56 algorithms is a real torture, especially for those who do not claim the laurels of a champion, but are simply passionate about the process of solving the cube. For this case, a simpler and more convenient, but not so fast, version of 2-look OLL was invented. It consists of two stages: assembling the cross, then assembling the corners. For this option, there are only 10 possible algorithms.
PLL (permutation of last layer)
