Billiards training for beginners. Nine main points of impact

Habits that will make you happy

10 Signs You've Been Visited by an Angel

They say that learning to play billiards is almost as difficult as learning to play the piano. This is partly true, because being able to play billiards beautifully is almost a talent, and also the fruits of perseverance, self-development, patience and perseverance. Anyone who wants to play billiards, not as a beginner, should have these qualities. And today we’ll talk about the rules of billiards and what you should know in order to learn how to play this difficult man’s game.
Billiards rules
Let's start with the most common types of billiards in Russia. These are "Eight" and "pool". A billiards player's equipment will always consist of a cue, chalk, and a table, whose format will depend on the game and the balls corresponding to the table.

What does your nose shape say about your personality?

How to behave if you are surrounded by boors
The main principle of the game is to hit one ball with such force that the other ball falls into the pocket, but then the rules of billiards begin, of which there are a great many in the world.
Russian billiards differs from any other in that the dimensions of the pocket are several millimeters larger than the ball, and this makes the game incredibly difficult, because the force and trajectory of the ball must be calculated so that the ball certainly hits the right place.
Russian billiards is played like this
- First, they build a pyramid of balls, where the top of the pyramid is white ball, - stands on a strictly marked point, and the cue ball - a red ball - stands on the other half of the table. The half of the table from which the game begins is determined at the request of the players and is separated by a line called the bolter.
- Players can choose to be the first to hit the cue ball. In Russian billiards, you are allowed to choose any ball - red or white - as the cue ball, and the rest of the players make shots in order.
- Shots in Russian billiards are called “strangers” and “brothers-in-law”. “In-law” differs from “stranger” in that the cue ball hits another ball and ends up in the pocket itself, rather than sending the ball it hit there.
- Now let's return to the "eight". This game is both simpler and faster than Russian billiards, because the pockets are so large that two balls can fit in there, and the table itself is much smaller. So, the rules:
- The cue ball is placed on the point marked on the bailer line, and the remaining balls form a pyramid on the side of the table where there is no bailer line.
- The first player is appointed by the players themselves. Only a white ball can be crowded and it is with this ball that the pyramid is broken
- Then, depending on which ball - hollow or striped - gets into the hole first, a certain player plays that way.
- If the black ball is not the last to be pocketed, then the player who made such a mistake is awarded a loss, since before pocketing the black one, the player must already have all the balls of his type. Then the player who scored black would be the winner.
As you can see, the game is not too difficult. The striking technique also does not require special skills. Hold the cue with your working hand, and place your left hand on the table 30 cm before the ball. Using two fingers, create a sort of groove that will guide the blow of the cue. Aim for the middle of the ball. If for this you need to bend as much as possible, press your chest against the table - bend over. Remember, your lead hand needs to be relaxed before striking. These are the simple rules of playing billiards.
Video lessons
Billiards is a "have a great time" game. Many people are fans of this fun and regularly go to specialized clubs to enjoy the process. Currently, not only men, but also representatives of the fairer sex play billiards. Many tournaments are organized in which people regardless of gender take part. How to learn to play billiards? Today, many opportunities open up for this: through regular training with a friend, coach, studying theory from books and videos.
Principles of the game
Most people do not realize that billiards contributes to the development of thinking of both a child and an adult. If it were taught at school, the question would not arise, where to learn to play billiards? Despite the importance of theory, it is impossible to become a professional without practice. There are three main principles of the game:
- Billiards is first and foremost a strategy. They play it with their brains, calculating all the options. It is very important to remain calm and cool. A person often feels excitement, especially when money is at stake. This usually results in a loss, so you need to keep a cool head.
- The second principle is theory and practice. In addition to reading literature and watching videos, you need to play often. To become a professional, you should train every day. It is necessary to understand that the blow should not be random; you need to choose the most optimal option to hit the pocket. It is not necessary to come to clubs to play - it will be useful to simply watch the professionals.
- How to learn to play billiards? You need to compete with a strong opponent. The higher the enemy's skill level, the more rewarding it is to play with him. You always need to compete with who is better. If you play with a weak opponent, the level will not increase.
Theory
This aspect is fundamental. To learn how to play Russian or American billiards, you need to understand the basics. Specialized literature has recently been greatly inferior to online tutorials. There are many videos where an experienced player teaches a beginner the basics of billiards.

When watching such videos, you should pay attention not to the beauty of what is happening, but to the technical aspects of the process. You won't be able to become a player high level without understanding how to choose the right stance, with what force you need to hit in a given situation, etc. Video tutorials will help in mastering these techniques. It explains in detail how to stand correctly, where to point the ball, how to hold the cue and much more.
Practice
How to learn to play billiards? Theory is good, but without the practical part, all efforts will be meaningless. If you are a complete beginner, it is recommended that you play with a player of the same level for the first time. With it you can practice the correct stance, striking, etc. This way you can understand how these elements are done. You can sacrifice time for this, that is, a beginner does not need to try to pocket all the balls faster. Attention should be paid specifically to the correct execution of the simplest elements.

The cue must be felt, this awareness will come a little later. Once a beginner acquires the necessary skills, he will understand that he needs to act differently in each situation. Then you can move on to playing with stronger opponents. Here the emphasis should be on technique and learning from your opponent. You need to note for yourself new chips and strikes that you saw from your opponent.
Lessons with a trainer
Many people are interested in how to learn to play billiards well? With the help of a trainer. For a certain fee, he will teach you the basics of the game and give you invaluable experience. You can find a trainer by asking friends and acquaintances who are interested in billiards, through advertisements, etc. You need to choose a person with whom you will be comfortable practicing, and then you will not feel tired after 4-5 hours of training.

At all times, billiards was considered gambling. It is quite difficult to learn his art, but the main thing is that there is a desire. You may need to improve your physical condition: strengthen your arms and body. Then the blow will be clearer and stronger.
So, how to learn to play billiards? There are several ways, you need to choose the most suitable one. While studying the theoretical part, we must not forget about practice. Train and work every day, and then everything will work out.
The initial information on the technique of billiard games presented to the reader is intended primarily for beginners and amateurs who want to independently master the basic technical and some tactics. They are based on modern and generally accepted methodological recommendations of leading masters. Despite the wide variety of billiard games, the basic techniques outlined below are equally inherent in all types without exception. The presentation is based on the example of American pocket billiards (pool). This is explained not only by the desire to introduce amateurs to this particular technique and tactics, until recently known only from excerpts from American films, but also a type of pocket billiards that is becoming increasingly widespread in Russia and around the world. The fact is that there is extensive educational and methodological literature on the pool, practically unknown to the domestic reader. These methodological developments useful to use when mastering any billiard game, be it pool, snooker or Russian billiards. In addition, the author’s long-term observations of the game of leading masters of Russian billiards at the world and Russian championships as a judge of the All-Russian category are summarized.
In presenting this section, modern billiard terminology is used. If necessary, please refer to the section “The ABC of Modern Billiards”.
NOTE. For left-handed billiard players, all of the following recommendations should be understood in reverse.
1. PREPARATION FOR IMPACT
In any business, a system is important that provides for a very specific procedure. For example, a combat commander acts according to the following proven scheme: assesses the situation, makes a decision and gives an order. Having crossed cues with an opponent at the billiard table, you must also act in a certain sequence: firstly, you need to assess the position on the table, secondly, make a game decision and, thirdly, prepare to hit. Preparation for an aimed strike, in turn, involves: choosing an aiming point and the starting position of the cue, approaching the table and taking a stable playing stance, lightly gripping the cue and setting a reliable stop, correct aim and warm-up swing movements. It should be especially emphasized that for any, even the simplest blow, you should prepare equally carefully, acting each time according to the same scheme. We also remind you that it is advisable to chalk the cue sticker almost before every shot to avoid kicking.
1.1. Selecting an aiming point
Preparing for any strike begins with choosing an aiming point. Below we will clarify this concept, but for now
By this we mean the point on the playing surface where the cue ball should be directed. Indeed, without choosing an aiming point, you cannot take a playing stance, because the center of the cue ball and the aiming point determine the direction of the blow, and therefore the initial position of the cue.
1.2. Gaming stand
The playing stance must provide balance, stability and freedom of swinging movement. Bring the cue sticker almost close to the cue ball and place three points in the same vertical plane - the chin, the cue ball and the aiming point. Turn to the right so that your right toe is located directly under the cue, and your left toe is slightly to the left of the cue line. In this case, a gap of 10 - 15 cm is formed between the cue and the body, providing freedom of movement. Distribute your body weight evenly between your right and left legs. Place the supporting hand of your left hand at a distance of 18 - 25 cm from the cue ball and lean forward. Hold the cue so that your right hand is located directly under your raised elbow. It is best when, when striking, the hand is 3 - 5 cm in front of the elbow, but in no case behind (see Fig. 1).
1.3. Grip
It was said above where to hold the cue. Now a few words about how to hold the cue. The cue should be held without tension using the thumb and the first three fingers of the right hand (see Fig. 2), while the cue should not touch the palm. It is important to maintain a light grip throughout the game. Squeezing the cue too hard when hitting the cue ball is a common mistake that not only affects accuracy, but also prevents

perform a number of fundamental technical techniques that involve transferring strong spin to the cue ball.
1.4. Wrist rest
A reliable WIST REST for the cue is extremely important for delivering an accurate shot. The positioning of the hand should be natural and at the same time give the cue a stable direction. There are two main stops - open and closed. When setting the OPEN STOP, the hand should be placed flat on the table, give it a slightly convex shape and press the thumb to the index finger, forming a V-shaped bend (see Fig. 3). This bend serves as a stop for the cue (see Fig. 4). To increase the height of the support, you need to pull your fingers towards you, and to decrease it, pull them forward. This way you can confidently hit the top, middle or bottom of the cue ball. At the initial stage


mastering the technique of the game, when the main attention should be paid to accuracy and the ability to regulate the force of the blow, the beginner should select the height of the stop so that the blow hits the center of the cue ball, that is, so that the blow turns out to be CENTRAL. OPEN REST SIZE is defined as the distance between the cue ball and the thumb. As a rule, stops ranging in size from 18 to 25 cm are used. Experienced masters use an open stop when performing shots that do not require strong rotation of the cue ball. It is very important to use an open backstop when hitting distant balls, where you have to stretch out and place your backing hand more than 30 cm from the cue ball (see Fig. 5).
As the technique improves, it will become necessary to practice hitting other parts of the cue ball, located above, below, to the left, to the right, etc. It should be noted that with a strong DECENTRED IMPACT it becomes more difficult to maintain not only more

prolonged contact of the sticker with the cue ball, but also a STABLE DIRECTION OF ACCOMPANIMENT. In these cases, it is recommended to use a so-called closed stop. To set up the CLOSED REST, place the support hand flat on the table, firmly resting the bottom of your palm (see Fig. 6). Bend your index finger so that its end touches your thumb (see Fig. 7). Using the inside knuckles of your thumb and index finger as a guide, insert the cue into the closed loop they create. Now firmly grasp the cue with your index finger, while the loop should be loose just enough so that you can easily swing the cue back and forth. After this, spread out and firmly place your middle finger, ring finger and little finger on the table. They form a tripod support, which should be strong and at the same time natural. With the stop placed correctly, the cue can easily be moved


moves, maintaining exactly the specified direction. To increase the height of the stop, raise the shackled fingers (see Fig. 8), and to decrease them, lower them so that the thumb is placed flat on the playing surface of the table (see Fig. 9). This emphasis provides more stable support. Moreover, the softer and smoother the shock-swing movement is, the higher or lower parts of the cue ball can be struck without fear of the cue sticker slipping along the surface of the cue ball (kick).
Let's now look at the STOPS ON THE HANDBAIL. If the cue ball is more than 10 cm from the board, place your support hand on the rail and place your thumb under your index finger (see Fig. 10). Move the cue close to your thumb and grasp it on the other side with your index finger (see Fig. 11). When performing a strike, keep the direction horizontal if possible.


cue. If the cue ball is less than 10 cm from the board, place the cue between your thumb and index finger. Place the remaining three fingers on the handrail, as shown in the picture. 12. If you need to hit the cue ball THROUGH THE BALL, proceed as follows. With all four fingers resting on the table surface behind the interfering object ball(s), raise your hand to the required height and place the cue on the rest formed by the thumb and index finger knuckle (see Figures 13 and 14). This is an inconvenient stop, but it is extremely necessary in practical play.
(If the cue ball is out of reach, use the MACHINE. Place the front of the machine on the table at a distance of 15 - 20 cm from the cue ball, and move the end to the side and hold it with your left hand. Place the cue in one of the cutouts. Grasp the horizontal bar from below with the large one, and on top with the rest four fingers of your right hand and move your elbow to the right, as shown in Fig. 15.)


1.5. Aim
Correct aim is the basis for an accurate strike. Below we will clarify the method for determining the aiming point. If the aiming point is determined, then all attention should be focused on accurately directing the cue to this point. Let's return to the gaming stand (see Fig. 1). During the aiming process, the gaze slides from the center of the cue ball to the aiming point and back, while the player adjusts the direction of the cue, trying to orient it exactly along the aiming line. If necessary, move the stop and/or body slightly. Once the cue is oriented and ready to hit, your eyes should be focused on the aiming point.
1.6. Warm-up swing movements
When performing a strike, the hand, or rather, the part of the hand from the elbow to the wrist, makes a SHOCK-SWING MOVEMENT. Therefore, before performing any shot, you should make sure not only that the playing stance and sight are correct, but also that the cue can slide back and forth freely to the full size of the rest (18 - 25 cm). To do this, several warm-up swing movements are usually performed. This is a kind of rehearsal for the strike. It not only trains the hand to move the cue strictly in the direction of the aiming point. During rehearsal, the player mentally replays the blow, activates muscle memory and selects the necessary acceleration of the swing motion. The more difficult or stronger the blow, the longer the rehearsal should be. Typically, experienced players make from three to ten warm-up swing movements before hitting, depending on the degree of difficulty of the shot.
When performing warm-up movements, the gaze continuously monitors the correctness of the sight. It is also necessary to ensure that the swinging, pendulum-like movement strictly in the aiming plane is performed by only part of the arm from the elbow to the wrist. The elbow drops strictly vertically only during the SUPPORT stage (see below). This is the key to the accuracy of the strike.
1.7 Swing
When swinging, the hand is slowly retracted to the starting position. The stronger the blow, the further you should move your hand back. It is important to swing equally slowly, regardless of the force of the blow, and, after moving your hand away, take a short pause.
2. SHOCK-FLOW MOTION
From this moment, the cue begins to smoothly accelerate forward with a strike and transfer of movement to the cue ball. At the same time, the hand makes a movement that we will call SHOCK-SWING. Outwardly, it looks like a single movement, but essentially it consists of three components: ACCELERATION (ACceleration) of the cue, RECOIL DAMPING and CALL SUPPORT.
Thus, hitting the cue ball is the central, but not the only stage of the striking-swing movement. At the ACCELERATION stage, the hand imparts forward movement to the cue, accelerates it to the required speed, and gives it the necessary kinetic energy. At the DECREATION stage, the accelerated cue comes into contact with a stationary cue ball, and an impact occurs as such, that is, a collision and interaction of two bodies. At the same time, it is important to dampen, soften the impact and recoil, and prevent premature tearing of the cue ball from the sticker under the influence of peak impact forces. At this stage, the cue ball overcomes the inertia of rest and moves away. At the SUPPORT stage, which is the final and most important part of the shock-swing movement, the cue ball is accelerated to a given speed, giving it a given movement. This, strictly speaking, boils down to all the previous preparation for a strike and the strike-swing movement itself as a whole. It should be immediately emphasized that accompaniment is not pushing through, and certainly not moving after the cue ball. Unlike pushing, follow-up is an integral part of any correct striking-swing movement. It's all about proportionality here. According to international rules pool, it is the disproportion to the shock-swing movement that distinguishes a push (push) from a correct blow. Pushing, throwing, pushing - this is accompaniment without hitting. An unaccompanied strike, when the cue ball immediately breaks off the sticker, is a hard, undamped and, as a rule, inaccurate strike, or even a kick. (The only exception is a correctly executed JUMP in a pool, which is described in detail in the section “The ABC of Modern Billiards.”) Typically, normal accompaniment is 10-15 cm. Naturally, it must be proportioned to the specific position of the balls on the playing surface of the table. In this case, under no circumstances SHOULD YOU CONTINUE TRACKING UNTIL THE CALL COLLECTS THE OBJECT BALL. This can be classified as both a push and a double strike. In any case, this is against all the rules and is punishable by a foul (fine).
Thus, acceleration, damping and tracking are inextricably linked and are integral parts of the same shock-swing movement. And at each stage, one thing is important - smoothness, smoothness and smoothness. At the first stage, it is important to smoothly accelerate the cue strictly in the aiming plane. At the second stage, a smooth transition from the acceleration of the cue to the acceleration of the cue ball is important (we will also call the smoothness of such a transition the softness of the blow). And finally, at the third stage, smooth acceleration of the cue ball is necessary. This is what ensures the smoothness and integrity of the entire shock-swing movement and the smooth transmission of a given movement to the cue ball.
So, we have gained an understanding of the procedure for preparing for an impact and the impact-swing movement. Now you can start practicing it, or, as they say, setting up a strike. As an initial exercise, we can recommend hitting the cue ball from the front mark into the far corner pocket. You need to start, naturally, with a CENTRAL IMPACT or even a blow just above the center of the cue ball, using an open wrist rest. Prepare for the strike in full accordance with the sequence of actions described above. Pay special attention to the stability of the playing stance and support, light grip and relaxation of the wrist joint, and immobility of the elbow. Make sure that the cue is aimed exactly at the target and that the hand can move freely back and forth to the full width of the fence (18 - 25 cm). Then perform several smooth warm-up swing movements. Stop the cue at the cue ball and check the accuracy of the aim by glancing in a straight line from the cue to the aiming point. If the scope looks perfect, focus your gaze on the aiming point. Make a slow swing and, with the necessary acceleration, make a smooth shock-swing movement accompanied by the cue ball forward. In this case, the cue, having passed strictly above the front mark, should stop 10-15 cm in front of it, maintaining the direction along the aiming line. If after performing a strike the cue moves to the left or right, repeat the exercise again until you achieve the desired result.
It is very important to swing equally slowly, regardless of the force of the cue ball. In no case should you pull the cue back faster just because you need to hit harder. Here the situation is the same as when throwing a ball: in order to accurately hit the target, we slowly move our hand back and then make a strong throw forward.
The next step is to practice hitting the object ball head-on by placing the object ball on a straight line connecting the cue ball and the center of the corner pocket. In this case, the aiming point is the center object ball. Practice hitting with different strengths, changing the distance between the balls.
3. CONCEPT OF CUTTING
The collision of the cue ball with the object ball occupies a special position in the technique of billiards. On the one hand, we give movement to the object ball. On the other hand, we change the speed and direction of the cue ball movement. This issue is quite complex, and for now we will consider only one side of it - giving movement to the object ball. We will assume that the balls are absolutely elastic and there is no friction between them. This is almost true. At least if the balls are aramite. Upon impact, the object ball begins to move under the influence of a shock impulse, which is directed from the point of impact to the center of the ball. This is the basis of CUTTING. Correct cutting is the basis of good MASONRY. However, cutting patterns must be known and taken into account when performing any shot, regardless of whether we pocket the ball or not. The ability to direct the object ball to a given point on the playing surface of the table is an important element of positional play. In addition, cutting largely

Rice. 39. Collision during cutting.
depends on the possibility of using certain technical and tactical techniques.
Let's look at fig. 39. Let's say that we need to give the object ball movement towards the center of the pocket (arrow a). Then impact force must be applied from the diametrically opposite side. In other words, the collision must occur at point A. We will call this point the COLLISION POINT. Determining the point of impact is not difficult. To do this, you need to approach the object ball from the side opposite the pocket and carefully look in the direction of arrow a. Then the point of impact will be facing directly at you. In order for a collision to occur at this point, the center of the cue ball at the moment of impact must be at point B. This is the AIMING POINT, that is, the place where the cue ball needs to be directed. THE POINT OF AIM IS HALF A BALL FROM THE POINT OF IMPACT. This is fundamentally important for performing an aimed strike. (In Russian billiard literature, following Lehman, the point of impact is called the “true aiming point.” In our opinion, this term should be abandoned, since the cue, with the correct aim, is directed not at the point of impact, but at the aiming point. The proposed terminology corresponds to the generally accepted world practice.) The straight line connecting the center of the cue ball to the aiming point is called the AIM LINE. It is along the aiming line that the cue should move when hitting correctly. And it is along the aiming line that the cue ball should be directed. Only then will the blow be accurate. Therefore, there is no need to prove how important the correct scope is. It should be added that once the aiming line is established and the eye glides along it, then any point on this line can be used as a reference point for the sight, sometimes even a point on the handrail or playing surface of the table. (In some cases, it is useful to estimate which point on the surface of the cue ball will come into contact with the object ball. How to do this can be seen from the figure. The desired point is indicated by the letter C. The direction of the straight line SA coincides with the direction of the aiming line.)
We will call the angle between the direction of aiming and the given direction of movement of the object ball the CUTTING ANGLE. As the aiming line moves away from the center of the object ball, it changes from 0 to 90 degrees. In a FRONTAL IMPACT, when the aiming point coincides with the center of the object ball, the cutting angle is zero. The object ball receives movement in the direction of the original movement of the cue ball. In a head-on collision, almost all the energy of the forward motion of the cue ball is transferred to the object ball. In contrast, when making a shot at the LIMIT CUT, when the cue ball barely touches the object ball, the cutting angle is close to 90 degrees. In this case, the object ball receives an extremely small forward momentum, while the cue ball practically retains its kinetic energy.
The remaining cases occupy an intermediate position. Of particular interest is HALF-BALL CUTTING, when the aiming point is shifted half a ball away from the center, while the natural reference point for aiming is the edge of the object ball. The cutting angle in this case is exactly 30 degrees. That's probably all you need to know about cutting. The rest comes with experience. Practice hitting shots at a variety of cutting angles and gradually increasing the distance between the balls. Over time, you will learn to accurately determine the point of impact and the point of aim literally at first glance, just as the masters do.
4. CUE BALL MANAGEMENT BASICS
A central strike on the cue ball is, in principle, quite enough to master placing an object ball. And if the reader opened the book only to learn how to guide the object ball into the pocket, then, having familiarized himself with the concept of cutting, he can immediately begin to play. Indeed, for many billiards lovers it is a laying of balls and nothing more. They don’t even suspect that, in principle, a cue ball can and should be controlled, that where it stops can be controlled. Concentrating all their efforts on placing the object ball, every time in case of a miss they beg the cue ball to hide behind the balls, stop at the short side, roll a little further, etc., as if they were not the ones who set it in motion. No matter how important the strength and accuracy of a strike is, for a serious game this, alas, is not enough. The masonry becomes a formidable weapon only in combination with the technique of control and management of the cue ball. This is necessary not only and not so much for pocketing the cue ball in Russian billiards, but for playing positional play - the basics of pocket billiards, be it Russian billiards, pool or snooker. The game of a person who has learned the intricacies of control and management of the cue ball with an inexperienced amateur is the same as a duel between a karate master and a street bully who has learned only one blow - with a swing to the jaw. However, it's not just about the result. If you master the technique of control and management, the extraordinary beauty and truly unlimited possibilities of positional play, its deep intellectual aspects, will be revealed to you. The game becomes more interesting and meaningful. You will be able to show all your imagination and abilities. Isn't this worth the effort?
There is little difference between control and management. However, let us clarify that by CONTROL we will understand a set of technical techniques that allow us to change the trajectory, direction and nature of the cue ball’s movement before or after impact with the object ball or board. And under CONTROL - the ability to stop the cue ball at a given point on the playing surface of the table. Both are equally important.
4.1. Roll up, stop and pull back
ROLL, STOP and PULL - these are the three pillars on which the entire cue ball control technique rests. And a beginner must first of all master these technical techniques. It is clear that the roll will happen if the cue ball retains its top rotation after a FRONTAL collision; stop - if the cue ball does not acquire the top rotation at the moment of impact or loses the bottom rotation given to it due to friction on the cloth; and, finally, a draw - if the cue ball maintains sufficient downward rotation after impact. When performing a roll, the blow is usually delivered to the upper half of the cue ball, and the higher the blow is struck, the stronger the top rotation the cue ball receives. When performing a backdrop, on the contrary, the lower the blow is struck, the stronger the downward rotation is imparted to the cue ball.
Let's immediately stipulate that bottom spin and PUSH are far from the same thing, although in billiard literature these concepts are hopelessly confused. Bottom twist of the cue ball is a mandatory, but not the only condition for performing a quickdraw. On the other hand, the bottom twist is used not only for quickdraw. It is used, for example, when performing a stop. The author has repeatedly observed how beginners, either on a whim or after reading something about “klapstoss,” try to stop the cue ball with a short and hard central blow, stopping the cue immediately after the sticker touches the cue ball or even moving it back. Of course, nothing will come of this. In order to stop the cue ball, it must be given sufficient downward rotation. Then, due to friction on the cloth, he will lose it when approaching the object ball. The difference in the technique of stopping and pulling is in “how much” of the spin can be “conveyed” to the object ball.
To impart downward rotation to the cue ball, a fairly fast and soft “clipping” movement with wrist accompaniment is required. But that's half the battle. If all your efforts are concentrated only on adding twist, then the PUSH will not work. The underspin will not be able to reach the object ball. It will be “eaten up” very quickly by friction on the cloth. The main condition for performing a quickdraw is that, IN ADDITION TO A STRONG UNDER ROTATION, THE CALL SHOULD BE GIVEN A STRONG SLIDING FORWARD MOTION. The concepts of SLIDING and SLIDING IMPACT are described in detail in the section “The ABC of Modern Billiards”. It remains to add that only with a strong glancing blow can you quickly “bring” the bottom rotation to the object ball.
How can one practically ensure a combination of a strong underspin with a strong sliding forward movement? First, you need to find the optimal impact point. Here the situation is this: the closer to the center, the more sliding, but the less twist, and vice versa. There are no uniform recommendations here and cannot be. It all depends on the distance to the object ball and how far we want to pull the cue ball. Approximate application point

Rice. 40. Approximate point of impact when performing a quickdraw.
shown in Fig. 40. It is spaced from the center by approximately half the radius of the ball. Secondly, you need to deliver a strong but soft blow with a stable cue ball accompaniment. When performing a stop and draw, it should be borne in mind that the further the cue ball is from the object ball, the lower and (or) stronger the blow should be struck. To achieve the maximum effect, the striking-swinging movement must ensure that the cue ball is accompanied forward by 10 - 15 cm. (We remind you that we are talking about strikes with a horizontally oriented cue. Strikes with a raised cue are strikes of the MASS category, and we have a special conversation about them.)
We offer several simple training exercises for practicing rolling up, stopping and pulling back. First, an exercise to practice ROLLING UP. Arrange the balls as shown in Fig. 41. Lightly hit the cue ball half a radius above the center so that after impact it stops in position 1. Repeat the hit with a little more force so that the cue ball stops in position 2. Now hit even harder

Rice. 41. Practicing coasting
and get the cue ball to stop in position 3.
The next exercise is for practicing STOP. Arrange the balls as shown in Fig. 42, starting at position 1. Hit the cue ball below center approximately one sticker diameter. You need to

Rice. 42. Practicing stopping.
raise the swing motion equally smoothly and strive to ensure that the cue ball stops immediately after contact with the object ball. Do this a few times to get a feel for how hard to hit. Then hit the cue ball a little lower and with a little less force, trying to get the same result. After this, move on to position 2. This time hit the cue ball below the center half a radius and a little harder than in position 1. By repeating the exercise several times in the new position, you will soon get a feel for how hard to hit. Continue training using starting positions 3 and 4 for the cue ball and increasing the impact force each time. If you have difficulty in a particular position, repeat the exercise until you achieve the desired result. Remember: the lower the cue ball is hit, the less force is required to stop the cue ball once it hits the object ball.
Let's now practice doing the PULLOUT. Arrange the balls as shown in Fig. 43. First hit the cue ball with moderate force, half a radius below the center, so that the cue ball rolls back to position 1. As you increase the force of the shot, make sure the cue ball rolls back further, stopping at positions 2 and 3. When performing these exercises, pay attention special attention should be paid to ensuring that the cue accompanies the cue ball forward by 10 - 15 cm. Both when stopping and when drawing, the cue ball is struck approximately half a radius below the center. If the striking-swinging movement of the hand is well practiced, strike the cue ball, slightly tilting the cue forward so that, having advanced 10 - 15 cm, it stops, almost touching the cloth.

Rice. 43. Practicing the quickdraw.
4.2. Outset
Let's talk now about the SIDE. It is also one of the main technical techniques for controlling and controlling the cue ball and is used when performing a variety of exits, winbacks, shots from the board, as well as when playing the cue ball into a pocket in the “Moscow Pyramid” and “American”. A side kick is a decentered shot with a side spin of the cue ball. It is used primarily for the purpose of expanding or narrowing the angles of reflection of the cue ball from the board. To widen the corners, use a side panel with a RUNNING SCREW, and to narrow the corners, use a side panel with a REVERSE SCREW. You should always remember that the side in a pool, as a rule, is used not to pocket the object ball, but to get under the next ball. Although the role of the side kick when playing with exits is extremely large, experience shows: the less often you use the side move, the fewer misses in the pocket. The fact is that sideways entails side effects, capable of changing the direction of the cue ball's movement. They manifest themselves especially strongly when striking with an inclined cue. This is the so-called mass effect (see section “The ABCs of modern billiards”). However, even when striking with a horizontally oriented cue, there is a slight deviation of the cue ball’s trajectory from the aiming line due to the impact impulse towards the center of the cue ball. In other words, the right side moves the cue ball a little to the left, and the left side moves the cue ball a little to the right. Therefore, when performing a right side shot, the aiming point should be shifted slightly to the right, and when performing a left side shot, a little to the left.
It should be emphasized that at the initial stage of mastering the technique, you should not get carried away with hitting areas of the cue ball remote from the center. The fact is that with a decentralized side impact, maintaining stable contact between the cue stick and the cue ball is much more difficult. Moreover, the harder and farther from the center the blow is struck, the more difficult it is. We have already said that the sticker must be chalked with special billiard chalk. Let us only add that when spinning the cue ball, you need to chalk especially carefully. Otherwise, instead of twisting, you may end up with a kick. In addition, the correct hemispherical shape of the sticker is important, ensuring the “hinge” of the contact.
Now about the softness of the blow and the smoothness of the accompaniment. It was already said above that good shock absorption and smooth tracking allows you to maintain contact between the sticker and the cue ball. It remains to add that when spinning the cue ball, these factors are doubly important. Moreover, relaxation of the wrist joint and wrist support play a special role. Why carpal? Each of us has spun a bicycle wheel at least once in our lives. Everyone knows that the impulse should be applied not to the center, but away from it (that is, decentered). Try, however, to spin the wheel strongly with a fist blow - nothing will happen. If you connect a brush and repeat approximately the same movement, the effect will be completely different. When spinning the cue ball, approximately the same thing happens.
Like any other technical technique, the side kick should first be practiced in training. In Fig. Figure 44 shows examples of changes in reflection angles depending on the direction of side twist when performing
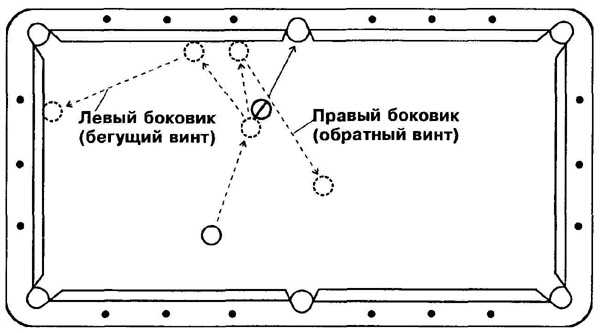
Rice. 44. Rolling with a running and reverse propeller.
NAKATA. Try to see this for yourself. There are countless options for the relative position of the balls. Practice shots of varying strengths with the RUNNING and BACK SCREW, while trying to CONTROL THE CUE. Over time, you can move on to performing a side kick in combination with a PUSH.
5. ELEMENTS OF POSITIONAL PLAY
Having mastered the basic technical techniques - rolling, stopping, pulling and side kicking, you can move on to mastering the basic techniques of POSITIONAL PLAY. Without pretending to fully cover all aspects of positional struggle, many of which are explained above in the ABC of Modern Billiards, we will focus primarily on the ability to make an EXIT. This is an element of active positional play. It plays an important role in any pocket game, but is especially important in pool and snooker, since these games are based on the ability to pocket not just one ball, but a SERIES of balls. If, for example, when playing “Russian Pyramid” or “Moscow Pyramid” a series of three or more balls is quite rare, then in pool and snooker, other things being equal, success accompanies the player who knows how to build a series and bring the game to victory.
The basis of the exit is CONTROL OF THE CUE. The point of OUT is to, after playing one simple object ball, place the cue ball in a place on the playing surface from where you can easily play another object ball. The easiest way to learn how to make an exit is by practicing a specific blow in training. In this case, the position of the object ball and cue ball should be marked on the felt with chalk, so that you can start from the same starting position each time. Arrange the balls as shown in Fig. 45. Pocket the object ball, hitting the cue ball just above the center, and watch where it hits the first edge and in what direction it bounces off it. If you hit the cue ball in the same place, but with different forces, then you can notice that the trajectory of its movement remains almost unchanged, only the path it travels changes (SIZE OF THE IMPACT). By adjusting the force of the blow, make exits for each of the object balls shown in the diagram.
If you now strike the cue ball from the same starting position just below the center, then the trajectory of its movement will change significantly. By adjusting the force of the blow, ensure that the cue ball, moving along the same trajectory, moves further and further across the table. Continue practicing, hitting the cue ball even lower. This will give you a basic idea of what will happen when you hit the cue ball at different points and with different forces.
The following exercise demonstrates how the trajectory will change when hitting the cue ball at points at different heights. Arrange the balls according to Fig. 46. If you perform a ROLL, the cue ball will describe the curve shown in the figure. If you apply a gesture

Rice 45 Exit processing

Rice. 46. Changing the trajectory of the cue ball.
cue FLAT just below center, the cue ball will go straight to the short side. If you hit the cue ball half a radius below the center, it will be pulled closer to the corner pocket.
Successful exit play is based on good POSITIONAL THINKING, which involves quickly finding the simplest ways to build a series. To develop positional thinking skills, it is recommended to perform an exercise that can be called “Three from the hand.” Throw three balls on the table. Let us assume that they are located as in Fig. 47. The balls are numbered in the order in which they are easiest to pocket. If you hit the cue ball above the center, then, having placed ball No. 1, due to the roll, it will hit the side and be reflected in the direction of ball No. 2. Depending on the force of the hit, the cue ball will stop in one of the positions shown in the diagram. It's very difficult to miss here. If you hit the cue ball again above the center, the cue ball, having placed ball No. 2, will stop inside the shaded sector. After this, it is easy to place ball No. 3.

Rice. 47. Three from hand.
Repeated repetition of the same blows - best way teaching the game. Don't get carried away with complex shots across the table. It is worth practicing only simple and medium-difficult strikes, when performing which they often make mistakes. An error in this case should be understood not simply as a miss in the pocket, but as an unsuccessful exit under the next ball. Therefore, during training, you should repeat the shot even if the object ball is played, but the exit did not work out. Practice the exit until you can confidently achieve the desired result. Many people believe that success in the game comes from the ability to execute difficult shots. Practice, however, shows that it is not those who perform complex strikes who win, but rather, on the contrary, those who cannot make the correct exit when performing simple strikes lose.
As a good training exercise for both beginners and stronger players, we can recommend games of Eight and Nine with modified rules. If a ball falls from breaking, then you can start your series PLAYING FROM HAND. After a miss on the pocket, the opponent begins his series also with his hand. The advantage of this game is that playing from your hand begins with examining the table. Even a beginner will see the opportunity to score two or even three balls. A more experienced player very quickly finds the most rational way to pot all the balls in sequence. This training game teaches you to quickly make standard game decisions and choose the easiest way to organize a series. An hour of playing "Eight" or "Nine" from your hand provides the same amount of training as fifteen hours of regular gaming practice.
It should be emphasized that technique and tactics cannot be considered in isolation from each other. The wider the arsenal of technical techniques, the more opportunities for positional play. Quite simple solutions were discussed above. As you improve your playing technique, you can move on to more complex and sophisticated outputs. However, everything has its time. You shouldn't rush things. Only after mastering the basic techniques can you move on to learning more complex ones, and it is important to correctly assess the level of your game. A beginner can be given simple advice: IT IS NOT AS IMPORTANT TO KNOW HOW WELL YOU PLAY AS TO KNOW HOW BAD YOU PLAY. I had the opportunity to communicate quite closely with many famous masters. And all of them, as a rule, are not satisfied with their game. This is quite understandable. As you improve your skills and gain experience, your ideas about what is good and what is bad change radically. Even those virtuosos who regularly finish their games with a cue complain about poor playing. Watch the play of recognized masters at official competitions, and then you will understand what modern high-level pocket billiards is.
It probably happened that friends invite you to play in bars or billiards clubs, but you refuse, citing being busy, in fact, you are simply embarrassed because you do not know this game.
Billiards is quite an exciting and exciting game. Absolutely everyone, without exception, can master its rules, which will help advance their training. If possible, study under the supervision of experienced players so that mistakes do not become habits. Watch how he holds the cue, makes shots, at what angle, and so on. If you are new to this business and are completely far from billiards, you need to first learn the theory.
How to learn to play billiards for beginners
Perhaps there are people who absolutely do not know for sure. So, billiards, board game, with a variety of rules based on the process of hitting balls with a cue, well, this is a long stick with a blunt tip. The game first appeared in ancient Asia, initially the table was made of granite and expensive stones, but when struck, it crumbled, then it was replaced by the table that we see in modern times. Billiards was popular in all ages; even Stalin himself liked to think while rolling balls. There are several types of it:
- Carom, aka French;
- Russian – divided into a simple pyramid, combined and dynamic;
- Snooker - English;
- Poole - American;
- Kaisa, or Carolina - Finnish;
- Novus is Baltic.
Constantly watch the professionals, copy their techniques, various techniques, ask questions, there is nothing shameful in this, you are just learning. With practice and clarity, everything will become easier.

How to learn to play Russian billiards
As you already know, the billiard game is divided into different directions, the rules, even they, are also divided into subtypes, for example, Russian billiards, the field of thirty directions differs. Its main characteristics are large balls, about sixty-eight millimeters in diameter, they are the same color and numbered from one to fifteen. Also, the tables vary in size, are covered with green cloth, and there are markings on it dividing the table into two parts. In general, there were a lot of disputes over directions, rules, there were also prohibitions, but after the formation of the Federation billiard sport, three were officially withdrawn. Common divisions of Russian are the Moscow pyramid and the American one. Other strike options are subject to a penalty.

The opening shot is played. The players stand on either side of the table line and immediately make shots together, moving the cue balls to the back board. The winning player is the one whose ball lands closer to the first board. An unsuccessful play, when the cue ball failed to touch the back board, entered the opponent's part, or fell overboard, in any of these situations, the play is repeated. As soon as the winner is determined, he takes the first actions. Then, the sequence of steps begins.
The balls are arranged tightly, in a triangular shape, like a pyramid. The cue ball is counted if the cue stick is hit. The location of all the balls in the house, the action takes place with reverse side, outlined line. The ball is marked when, after a correct hit, it rolls into the hole. It happens that he hits the hole by sliding down the side, then he returns to the game again, no penalty is charged. The same thing happens with an aiming device that falls overboard. The action is considered completed when the ball comes to a full stop; if it spins, a stop is expected.

What are the penalties in Russian billiards?
Knowing the correct requirements, you should know the penalty. To avoid exposing yourself to them, try to comply with honest actions. So, the fines:
- No batting with an object ball;
- Upon completion of the shot, the cue ball rolled out of bounds;
- The player's foot does not touch the floor;
- Suddenly you touched the ball while being hit by something;
- You cannot make a double strike with a cue;
- If you performed striking actions not using the cue ball;
- And of course, any interference in the opponent’s game.
Having understood the classic form, it’s not a bad idea to familiarize yourself a little with the others.
- American, initial setup, similar to the classic one. Its purpose is to place eight balls in the holes first. In general, the requirements are similar, the differences in the sizes of tables and balls are completely opposite to Russian ones. The player who pockets can make the next shot in a row. If none of the balls are pressed, after the action of the cue ball and the object ball, at least one must touch two different sides.
- Moscow - the starting position is standard, and the actions are carried out with a single ball. The player is allowed to place the cue ball at any point, but is warned if it is not placed in the house. If the ball is not touched and it remains in the home zone, the blow is made again.

You can observe for yourself, there is plenty to choose from, which game to start learning. Let's sum it up American pool- fast, active and dynamic, it is often preferred by young people; this species appeared in Russia not so long ago. As for Russian billiards, the game is measured, like chess in motion, and is suitable for absolutely anyone, regardless of level. If in doubt where to start, it is recommended to start with Russian. After mastering it, it will become easier for you to master other types and you will feel more confident.
When leaving the striking position, do not position the ball in a way that seems dramatic. To do this, you can make a shot where the cue ball goes to a new position, or roll the cue ball to a position that is inconvenient for your opponent. At the very beginning of the game, do not rush to the striking position, take a good look around. You can gain experience or improve your level by enrolling in any billiards school in your city. You can find their addresses on the Internet. Or, as an option, sports - bars, amateur clubs, also, all information on them can be seen on the Internet. The game of billiards itself balances emotions, helps to develop a number of qualities, as in any sport, character is developed. If you lose, don’t lose heart, this is another reason to work more on your knowledge and technique. Experienced billiard players approach this easily and with humor, never showing negative emotions.
Tell friends
Playing billiards is interesting, educational, entertaining, brings pleasure and allows you to always be among friends. How to properly set yourself up for the game and concentrate your attention on winning?
Playing billiards: learning basics!
Recently, there has been an increase in the popularity of billiards, and therefore the number of people who want to learn how to play it is rapidly increasing. Of course, everyone knows that self-study will not bring quick results and will require a lot of time, patience and effort.
Today you can find many clubs and organizations teaching the game of billiards. The main thing is to have the desire and, accordingly, the opportunity. Typically, in such establishments, the first payment and subsequent payments are used to purchase billiard tables, cues and balls for training beginners and holding billiard tournaments.
If you turn to professional players for help, it will cost much more, but the results will not keep you waiting. They will share their experience and secrets of the game to achieve perfection. According to statistics, having learned to play billiards, people consider it prestigious and soon buy tables for home use - honing their own skills and tournaments with friends. In the future, by playing billiards, you can earn a good living by participating in competitions.

First steps to learning
First of all, you need to learn how to concentrate properly on the game. Hitting technique is also very important. Unfortunately, not all players pay the necessary attention to it, so they do not become professionals, but remain amateur players forever. This is the reason that not everything can be understood by re-reading the theory. It is better to take lessons from professional players, so as not to roll the balls around the table, but to actually play.
The beginning of studies is divided into several stages:
- setting up a strike. Developing good movements is a long and hard work on yourself, but very necessary for a decent game;
- after some progress has been made, you need to move on to a more advanced technique: stopping the cue ball in different ways(roll-ups, pull-ups), positional play;
- study of specific shots, boarding systems, role-playing;
- After studying the theory of billiards, you can begin to improve your technique.
Each player must develop his own tactics and approach to shots, because this is the only way to bring his game to stability.

Principles of Billiards
To play a quality game you need to know many factors:
- Sighting eye. It is wrong to think that every player aims with his left or right eye just because it is convenient. Of course, most often the aiming eye is the one that is used to aim, but sometimes this is a significant mistake. It happens that only the left or right eye is targeted, and sometimes both. To determine this for yourself, you need to put the chalk on the short side of the table, and stand on the opposite side. Then you need to point your finger at it and close your eyes one by one, focusing your gaze on it. If, when closing the left eye, the finger clearly points to the chalk, then the right eye is aimed, and vice versa. In the case when the finger moves slightly to the sides when closing one and the other eye, they are both aimed.
- Aim point. Before you make a shot, you need to determine the point on the ball where you need to aim in order to get into the pocket. To do this, you need to imagine a line that runs from the middle of the pocket you want to hit to the center of the ball. And on its reverse side is the true aiming point. When the cue ball and the ball come into contact right here, a “goal” in the pocket is guaranteed. True, it is very important to make an accurate strike here. For experienced athletes this will not be difficult to do, but beginners still need to practice. To make the right shot, you need to concentrate well on it and confidently play with the cue, making only a few swings. If you make more than five swings, the blow will be incorrect. The reason for this is the relaxation of the eye muscles from excessive tension, which lasts only a few seconds.
- Player stance. There is no standard stance, it is different for each player. It depends on his physique, the type of billiards and the height of the table. But there are some recommendations regarding body position while aiming and striking:
Balance. The body is motionless, the load is evenly distributed on both legs, and the hand, which is the rest for the cue, does not experience the load;
The forearm is perpendicular to the table, this position is maintained during impact;
The hand holding the cue should feel free and comfortable without affecting the thigh or other parts of the body;
The position of the cue should be parallel to the table.
- Grip the cue. The clarity of the blow depends on the correct grip of the cue. The grip should be free and light, and the cue should not fall out of your hands. The wrist should be in line with the forearm without any tension. It is also important to determine where is the best place to pick up the cue. It depends on the person's height. First you need to determine the location of its center of gravity - hold the cue on your index finger. The place where the cue is balanced is the starting point. If you are short, it is better to take the cue at a distance of 15 cm from this point, and if the player is tall, then even further.

To play well, you need to perfectly master the types of cue grips. The main ones are closed and open bridges.
Closed is based on wrapping the index finger around the shaft to be able to limit its vibration. This makes a huge difference in hitting the ball confidently. The hand should be palm down and all fingers should point to one o'clock. The cue is placed across the thumb and second joint of the middle finger. At this time, the shaft is grasped with the index finger, and the thumb reaches towards it, thereby forming a closed ring around the shaft. The arm is straightened at the forearm, the elbow is fixed, you just need to slightly loosen the grip of the shaft. This way, the cue can easily pass between your fingers without wobbling around. different sides. If inconvenience occurs, the shaft should be rubbed with chalk or a special glove should be worn.
The open bridge is used more by people who do not have sufficient joint flexibility. The hand again lies on the table, palm down, with all fingers pointing in one direction. Instead of forming a ring around the shaft with your index finger, you need to lift the tip of your thumb slightly, forming a V. If you need to raise the cue, just pull your fingers up so that your palm resembles an inverted bowl. Rarely, but still used, a bridge is used when the thumb is raised and the rest form a fist.

It is best to start training with beginners in order to get used to the table and cue, then the support of a more experienced player is needed. It is necessary to pay special attention to the technology of the strike and to remember well the best solutions in repeated situations. There is no need to be afraid to ask your mentor again in order to successfully get out of a situation in the game.
It is advisable not to rush, but to carefully plan your moves. At first, it is better not to play for more than two hours, since overwork usually reduces the performance of the game.
Have a wonderful time in the billiard room and good luck in the game!