How to draw your own weapons in Skyrim. Tips for creating a superhero (no cheats)
When games provide room for creativity, it would be a shame not to take advantage of it. How to make mods for Skyrim is exactly the question that, having thrown off the veil of ordinaryness, will make you feel a piece of creative genius. It is the process of creating and modifying equipment using the Creation Kit that will be carefully described in this article.
It’s worth starting steps towards creating something new and unique with things that already have their own structure: visualization, audio accompaniment and graphic data. In this case, the time spent creating the item will be devoid of the bitterness of mistakes, and your nerves will remain as strong as before.
When getting to the question of how to make a mod for Skyrim, you need to decide on the thing that you want to own. Let's take the Daedric Sword as an example. To create it, you need to click Filter in the Object Window that appears.
Using this button, the player will be able to enter the name of the desired item (DaedricSword). Then, going down, find All. After clicking, find the one you need in the list of objects that appear.
Right-click and select the Duplicate option. After updating the Object Window, you need to click Filter again, type “DaedricSword” with a space after the word, and then delete the same space. Now a duplicated item with the name “DaedricSwordCOPY0000” will appear. If you don’t want to stop there, double-left clicking on the sword will open a settings window where the object can be edited.
It happens that simple copying is not enough to satisfy the creative soul. In this case, following the question of how to make a mod for Skyrim, it’s worth practicing the process of improving things yourself. The Vorpal sword is one suitable option. To own the weapon of your dreams, you just need to change its own settings, specifying the following parameters:
ID = VorpalSword
Name = Vorpal Sword
Damage = 10000
By clicking OK, you will be notified by the editor that a new item has been created. The next step in the plan is to change the name of the weapon. To implement it, you must click “No” when asked if you want to recreate the sword.
After changing the name, the editor will try to approve the final result. By choosing “Yes”, you are already a few meters away from the opportunity to try out a powerful weapon in practice. To complete, you must ensure that all changes have been saved.
Start the game with the plugin already connected, then enter in the console (called with a tilde ~) player.EquipItem VorpalSword 1. When the weapon is already in your hands, you can safely go in search of warring life forms in the world of Skyrim.
Skyrim how to make mods for copying and creating armor will be described below. The process exactly repeats the situation with weapons. For example, to create a glass shield (Glass Shield), you still need to click on Filter in the Object Window and type the corresponding request (ArmorGlass).
Duplicate an item by right-clicking and selecting the appropriate Duplicate function, open Filter, then add and remove a space. In the list on the right side of the screen there will be a long-awaited item called “ArmorGlassShieldCOPY0000”. To edit, double-left-click on the duplicate to bring up the corresponding options window.
Now you can configure.
The path to perfection is always long and difficult, but isn’t it the obstacles and overcoming them that are the magic thing that attracts millions of users? Now, possessing the power of a real dragonborn, you will not be afraid of any dangers on the long journey of pilgrimage.
I didn’t go into much detail, but here I will tell you in great detail how to create the most effective weapon step by step. I love running with the classic shield + sword pair, and we will create a masterpiece using the example of a one-handed sword.
We will need enchanting elixirs and blacksmith elixirs. Therefore, we will start by creating a set of things that improve the alchemist's skill.
Alchemist Item Set
Alchemy will help us in creating elixirs. If in your travels you were unable to find a potion that increases enchantment, then with an enchantment skill of 100, you can create a set of 4 items that gives you a total of (25 x 4) 100 units of alchemist skill. Using this kit you will create enchanting potions. It is advisable that you have 100% alchemy.
By using the created potions, you will temporarily enhance your enchanting abilities and again create a set of " young alchemist" A new set of items will have an even greater effect, so an enchanter's potion brewed in a new outfit will be even more effective. This will allow you to create an even better alchemy kit.
As a result, the maximum efficiency that I managed to achieve was creating an alchemist set with items that give 29 units of alchemy skill. In total (29 x 4) 116 units. This set of items allows you to brew an enchantment potion that improves your skill by 32 units.
What is needed to create the “young alchemist” kit.
Four items - ring, amulet, helmet (mask, tiara, etc.), gloves (bracers, etc.). 4 soul stones filled with souls no worse than the great ones (Grand). A couple of enchantment potions to enhance the skill. Hand-brewed potions usually last for 30 seconds. Therefore, you need to act quickly.
Ingredients for an enchantment potion.
Don't forget to equip the Young Alchemist kit if you've already created one. The potion will require two ingredients from the following list −
- Hagraven Claw
- Snowberries
- Blue Batterfly Wing
In the game you can find potions that give up to 25 skill units.
Blacksmith Item Set
The ideal alchemy kit (created before this) allows us to move on to the next step - creating a set of items for the blacksmith, as well as creating a blacksmith's elixir.
What you need for a blacksmith kit
To create, you again need four items - a ring, an amulet, a breastplate (cuirass, dress, blacksmith's apron, etc.), gloves (bracers, etc.). 4 soul stones filled with souls no worse than the great ones (Grand). A couple of enchantment potions to enhance the skill.
We should get a set that gives a total of (29 x 4) 116 units to the blacksmith skill.
Weapon Making
When creating the base of a weapon, you can have neither a blacksmith’s kit nor a blacksmith’s elixir. We will need all these items when sharpening. Therefore, it doesn’t matter whether you yourself created the appropriate basis for our formidable artifact or accidentally found a weapon somewhere during the game. Before sharpening, it doesn’t even matter what blacksmithing skill you have.
 Sharpening is affected by the presence of blacksmith perks, which allow you to sharpen weapons made from the appropriate materials twice as well. Before sharpening, make sure you have enough sharpening materials. Put on the “young blacksmith’s” set, drink the blacksmith’s elixir, and go ahead.
Blacksmith's Elixir
Before creating, do not forget to put on the “young alchemist” kit. You will need two ingredients from the following list −
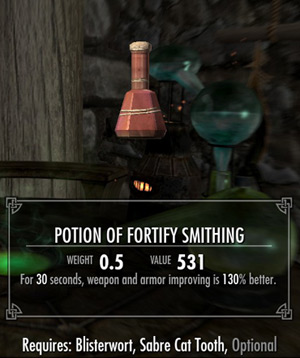
- Blisterwort (Fierce Mushroom)
- Glowing Mushroom
- Saber Cat Tooth
- Spriggan Sap
The elixir I received improved my blacksmith skills by 130 points! At the same time, I did not find blacksmith elixirs with a value of more than 50 in the game.
Improving weapon skill
« It is not the sword that makes the man, but the man is the sword.»
 The final, very significant touch will be the enchantment of an “everyday” set of items to increase weapon skill. Again you will need enchantment elixirs, 4 items and 4 soul stones with souls no worse than Grand. In my case, this is the skill of using one-handed weapons and the following items: ring, amulet, gloves and boots.
Thanks to elixirs and developed enchantment skill, it is possible to increase the mastery skill by (47 x 4) 188 points.
Because enchantment will most likely allow you to apply two effects to each item, then think in advance what you need in addition to the basic weapon skill. The picture shows an example of gloves that, in addition to the skill with one-handed weapons, improve the skill with a bow, which I also often use.
Enchant weapons to deal extra damage
It would seem much more? But there is no limit to perfection. In addition to upgrading the enchanting skill itself, it would be a good idea to take a perk that allows you to apply two effects at a time. Next is a matter of taste.
I looked at magical effects in terms of maximum damage. Three elements (fire, cold, electricity) give three pairs of possible combinations. At the same time, the damage of the “Fire + Electricity” pair was less than for the remaining two pairs. This is due to the magic of the school of destruction, in which I took a perk that increases cold damage. The fire itself deals 1.5 damage (damage immediately upon impact and half from setting the enemy on fire). Therefore, I opted for the “fire + cold” pair.
Damage from each element added 36 points to weapon damage. In addition, we will add 18 points from the subsequent burning of the target and 36 points of endurance. Endurance can no longer be counted, because “the dead don’t sweat.” The total damage to health from magic will be up to 90 points.
Result
I didn't take the blacksmith perks from the metals branch heavy armor(Ebony, Daedric, etc.). That. The best material with double sharpening turned out to be Glass - glass. Of course, there is a mod for Skyrim that adds many additional items to the forge list, including weapons made from dragon bone, and I could use the Dragonbone Sword as a basis, but I won’t consider this option for ethical reasons :) here.
Blacksmithing is a skill that determines the ability to create and improve weapons and clothing, which includes armor, simple clothing and jewelry. The higher your skill, the more you can improve your weapons and armor. The Smithing perk tree has a total of 10 perks to get all the upgrades.
Perks
| Perk |
ID |
Req. skill level |
Required perk |
Description |
|---|---|---|---|---|
| Steel armor
(Steel Smithing) |
000cb40d | not required | not required | You can create steel armor and weapons at all forges and upgrade them to twice the level. |
| Blacksmith Wizard
(Arcane Blacksmith) |
0005218e | 60 Blacksmithing | Steel armor | You can upgrade magical weapons and armor. |
| Dwemer armor
(Dwarven Smithing) |
000cb40e | 30 Blacksmithing | Steel armor | You can create Dwemer armor and weapons at all forges and upgrade them to twice the level. |
| Orc armor
(Orcish Smithing) |
000cb410 | 50 Blacksmithing | Dwemer armor | You can create Orc armor and weapons at all forges and upgrade them to twice the level. |
| Ebony armor
(Ebony Smithing) |
000cb412 | 80 Blacksmithing | Orc armor | You can create ebony armor and weapons at all forges and upgrade them to twice the level. |
| Daedric armor
(Daedric Smithing) |
000cb413 | 90 Blacksmithing | Ebony armor | You can create Daedric armor and weapons at all forges and upgrade them to twice the level. |
| Elven armor
(Eleven Smithing) |
000cb40f | 30 Blacksmithing | Steel armor | You can create elven armor and weapons at all forges and upgrade them to twice the level. |
| Complex armor types
(Advanced Armors) |
000cb414 | 50 Blacksmithing | Elven armor | You can create lamellar and plate armor at all forges and upgrade them to twice the level. |
| Glass armor
(Glass Smithing) |
000cb411 | 70 Blacksmithing | Complex armor types | You can create glass armor and weapons at all forges and upgrade them to twice the level. |
| Dragon armor
(Dragon Armor) |
00052190 | 100 Blacksmithing | Glass armor or Daedric armor |
You can create dragon armor at all forges and upgrade it to twice the level. |
Using a skill
You can forge objects only in special places - forges. There are several types of tools available at the forge:
- Grindstone (orig. Grindstone) : Allows you to sharpen weapons, thereby giving them more damage. The higher your Blacksmithing skill level, the more damage your weapon will deal.
- Workbench (orig.Workbench) : Allows you to upgrade your armor. The higher your Smithing skill level, the stronger your armor will be.
- Forge (orig.Forge) : Allows you to create new weapons and armor from raw materials. The range of what you can create is determined by your perks.
- Anvil (orig.Anvil) : Same as blacksmith's forge.
It should be noted that the production of raw materials occurs with the help of other tools, the use of which is not included in the concept of Blacksmithing.
- Tanning stand (original Tanning Rack) : Allows you to obtain leather and strips of leather from hides; skins can be removed from captured or found dead animals.
- Smelter (orig.Smelter) : Allows you to cast ingots from ore or Dwemer debris; ore is mined in mines using a pickaxe; Dwemer debris can be found in Dwemer ruins. As a rule, a free pickaxe (weight - 10) can always be found directly in the mine, so it is not necessary to carry it with you (note: there are also outlets of mineral and ore veins in the Black Reach).
Item quality
Using a whetstone/workbench allows you to upgrade your weapons/armor depending on your skill level "Blacksmithing". Possible item quality levels: Good , Qualitative , Great , Irreproachable , Epic And Legendary .
| Quality | Required Skill | Effect | |||
|---|---|---|---|---|---|
| No perks | With perk | Armor | Other | ||
| good (orig.Fine) | 14 | 14 | +2 | +1 | 1.15x |
| Qualitative (orig.Superior) | 31 | 22 | +6 | +3 | 1.3x |
| Excellent (orig.Exquisite) | 65 | 40 | +10 | +5 | 1.5x |
| Impeccable (orig.Flawless) | 100 | 57 | +13 | +7 | 1.65x |
| Epic (orig.Epic) | 134 | 74 | +17 | +8 | 1.82x |
| Legendary (orig.Legendary) | 168 | 91 | +20 | +10 | 2.0x |
- For example: your skill "Blacksmithing" equals 45 ( with the Dwemer armor perk) and some elven and dwarven equipment. With the right materials you could improve Dwemer armor to quality Great , A Elven armor- only up to the level Qualitative .
- Skill "Blacksmithing" above 100 can be achieved using the effect "Skill Upgrade: Blacksmithing", creating under this condition weapons and potions with a quality no lower Epic or Legendary.
- Item reaching level Legendary, will not display its quality in the future. Every new level increases armor rating by 3.6 and weapon rating by 1.8, which will lead to an increase of approximately 0.1 units. skill effect for armor and +0.05 units. for other items.
- Using enchantment, when improving weapons or armor, they can be improved again. Despite the fact that your skill is constantly increasing by increasing it or using enchanted items and potions.
Skill Upgrade
Selecting a character's race
The following races have a bonus to the Blacksmithing skill:
- +5 bonus points: Nord, Orc, Redguard
Teachers
| Level | Teacher | FormID | Location | Other Services |
|---|---|---|---|---|
| - Normal (0-50) | Gorza gra-Bagol | Markarth | ||
| - Expert (0-75) | Balimund | Riften, in the Forge | ||
| - Master (0-90) | Jorlund Graymane | Whiterun, in the Sky Forge. Note: You must join the Companions to use the services of this teacher. | ||
| - Master (0-90) | Gunmar | In the forge of Fort Dawnguard. |
Skill books
- Gunsmith competition (orig. The Armorer's Challenge)
- Heart of Cherim (original Cherim's Heart)
- Making Heavy Armor (orig.Heavy Armor Forging)
- The Last Scabbard of Akrash (orig.Last Scabbard of Akrash)
- Making light armor (orig.Light Armor Forging)
Free skill upgrade
- +1 skill "Blacksmithing" reward from Ongul Anvil for completing the quest Find Queen Freydis' Sword inside<Пещеры>" .
- +1 skill "Blacksmithing" reward from Rusleifa for completing the quest Rare gifts .
- +1 skill "Blacksmithing" reward from Gorza gra-Bagol for completing the quest Book wisdom .
- +1 skill "Blacksmithing" reward (as well as +1 to all other combat skills) from Giraud Giman from ( College of Bards) for completing the quest Drum of Rjorn .
- +5 skill "Blacksmithing" reward (as well as +5 to all other combat skills) if you choose "Path of Power" after reading the book Ogma Infinium .
Location of the forges
- Markarth, located north of the Witch's Brew, and the other one to the far right of the Jarl's throne in Understone Keep.
- Riverwood, next to Alvor and Sigrid's House.
- Whiterun, next to the Warrior's House.
- Windhelm, next to the market, west of the main gate.
- Riften, west of the market, in the city center.
- Shor Stone: On the porch of a building in the southwest (first building on the left if you enter from the south).
- Solitude, west of Castle Grim, called Solitude - Forge, belongs to Beirand.
- Dawnstar: South of the iron mine.
- Rift - Imperial Camp: east of Ivarstead, west of the Ruins of Btalft.
- Falkreath, after the store Gray Pine Goods and to the right of Lod's house.
Having upgraded your blacksmith skill to 100% and received all the blacksmithing perks, you already receive quite powerful equipment at the forge.
However, the quality of weapons and armor can be improved even further by using potions and enchanted items.
Here are some tips on how to effectively organize this process:
- To increase your blacksmith skill, you can enchant the following items:
- Ring.
- Necklace.
- Gloves(mittens).
- Cloth(armor).
- The effects of increasing the blacksmith's skill from these items when equipped are cumulative (unlike potions, where one bottle or ten drunk does not play any role - the total effect will still be the same as from one bottle).
- Of course, in order for the contribution of each equipped item to be as high as possible, it is necessary to develop the enchantment skill to 100% and obtain all the corresponding perks. There is no clothing that increases enchanting skill, but you can create a potion.
- To create enchanting potions, you will need any two of the following ingredients:
- Blue butterfly wing(Blue Butterfly Wing, 4th effect, FormID = 000727de)
- Sorcerer's Claw(Hagraven Claw, 3rd effect, FormID = 0006b689)
- snow berries(Snowberries, 2nd effect, FormID = 0001b3bd)
- Spriggan sap(Spriggan Sap, 2nd effect, FormID = 00063b5f)
- In order for the potion to be as “strong” as possible, the character must develop
Blacksmithing is basically the easiest of these perks. There are three ways, namely cheats, mods, and basic leveling.
Well, if everything is clear with cheats, then what does mod mean. There is such a Frostfall mod, there is one piece of equipment that can be assembled and disassembled due to this the perk will be upgraded. Here is a picture on it, you can see that this is the backpack you need to find or craft and disassemble and reassemble.
The hard way:
Well, the most honest way is the main leveling, it will take a lot of time, you will need to forge an iron dagger, for this you need:
Iron ingot x 1
Strip of leather
All this can be found in Skyrim or bought. Ore can be mined, and leather strips can be crafted from any animal skin. I didn’t count exactly, but 1500 pieces are needed of both.
Easy way:
To do this we need the Transmutation spell, it can be found here:
Next, we buy or mine iron ore and use a spell to make gold ore + if you have pumped up the change, then you will produce twice as much gold ore.
Enchantment
Here we can either enchant things that we made when leveling up blacksmithing, but we need to enchant to capture souls. Or come to Markrath and find Hamal, she is a skill teacher, but she won’t teach you that easily and you will have to go through the quest Dibella’s heart.
Brief walkthrough:
1.Find the future prophetess of Dibella
2.Save Fjotra from the Forsworn
3.Take Fjotra to the temple
4.Pray at the altar of Dibella
After that you can learn from her, she is a master. If you don't know how the teacher system works, here's an explanation: B game The Elder Scrolls V: Skyrim there are characters who, for a monetary reward, will provide the character with immediate growth in one of 18 skills. Each character has a specific qualification (Adept, Expert and Master). It is impossible to learn a skill beyond the skill of the character himself. If any character cannot teach the main character further, it is necessary to find a new teacher with higher qualifications. Adepts will help raise the skill level to 50 points; Experts will help you raise your skill level to 75 points; Masters have the most extensive knowledge on how to use a skill and will help you raise your skill level to 90 points. There is a limit for learning for a fee in the game: for each level a character gains, you can take no more than five lessons.
It's great that Enchantment was developed early. You can now apply a 29% improvement in the quality of potions to your headdress, gloves, ring, and amulet, making them not only more effective, but also more expensive. The recipe for developing a skill is simple: we travel around cities, buy all the ingredients from alchemists, try unknown ones, and brew potions from known ones. In the initial stages, it is best to develop the skill by mixing different ingredients and learning their properties. For better progress, it is better to mix not two, but three ingredients. So there is a higher probability that in a sample of not eight, but out of twelve properties there will be two identical ones. Of course, when mixing ingredients, it is necessary to take those that have more unstudied properties, which will allow you to learn new properties more often. For the same purpose, it is not recommended to take an ingredient for an experiment, all of whose properties are already known - the likelihood of discovering a new one will be much lower. At first, alchemy will not pay off, so we can simply not buy such expensive ingredients as Daedra hearts and elemental salts, making do with cheaper ones. First of all, we try to brew potions with the effects “Paralysis”, “Invisibility”, “Damage to magic regeneration”, “Magic regeneration”, “Increasing health” since such potions cost quite a lot. Alchemy is also a very good way to make money, as well as best way develop character skills. You can also find teachers as it was in enchantment.
Guide on how to raise your level and learn from teachers further
And so, if you have everything upgraded or you have already upgraded, we will start making our weapons and armor.
To start, we make two sets of armor and three rings and three necklaces.
We need to make potions, namely increasing the skill: enchantment, and for this we need to find:
Spriggan oleoresin - source: traders
Sorcerer's Claw - source: Sorcerer's Claw
Blue butterfly wing – source blue butterfly
Snow berries - plant source
But any two are not necessarily enough. For example: Blue Butterfly Wing + Snow Berries = Enhancement Potions: Enchantments.
We use our potion, namely increasing the skill: enchantment (18%) and enchant one ring and one necklace, one bracer and one helmet. Have time to do everything in one potion.
We put on our enchanted items and create a few more potions. You will have an increase of 31%.
We use the potion again, namely increasing the skill: enchantment from 31% and enchant things, namely one ring, one necklace, one helmet and one bracers. And after that we put it on. But few people know that the maximum is an increase of 32% and not 31%.
We drink a potion, namely increasing the skill: enchantment, and again enchant our things, namely one helmet, one bracers, one ring and one necklace, it should be 32%. We put on these things.
To make a blacksmith's potion we need for this:
Spriggan oleoresin – source of traders
Saber tooth fang - source of saber tooth
Fierce mushroom - source mushrooms
Glowing mushroom - source mushrooms
Making weapons in Skyrim
Well, many people ask questions on this topic, I decided to write a lesson on this topic so that there would be fewer questions. Well, let's start!
And so we go into our favorite window: Object Window
Section: Items > Weapon
I took: Sword of Blades (AkaviriKatana)
Rice. 1 
We open it and see a miracle window called Weapont. How incomprehensible everything is here!
I myself don’t understand anything! But now we’ll figure it out, stop panicking!
I’ll start with the simplest thing and there’s no need to spit and say: Yes, I know that, but don’t be tormented, let’s get straight to the point.
Someone knows, and someone doesn’t, I’m doing a lesson not for one person, but for everyone, so read carefully, maybe there’s something you didn’t know.
First comes: ID - Everyone knows this, well, almost everyone, ID is a unique number (in this case consisting of English and only English letters), using this ID you can find your weapon in the database
data and use in script functions, and also this is the most important thing how your weapon differs from other weapons. Okay, next comes: Name (Name), and don’t tell me the Name! I
I know what is translated exactly as Name, since I know English and we all remember the phrase: “What is your name?” "What's your name?" But think for yourself what name the sword could have or
bow? Is it possible to call it? This is an inanimate object and it can only be called and named, I think I conveyed my idea to you and convinced you. The name we will give to weapons
will be displayed in the game, that is, in the inventory, upon purchase, in general, always if we come into contact with this thing.
Well, next: Enchanting, I don’t know what it is, let’s finish the lesson....heh, of course I’m joking, this is an enchanting effect that we can give to this weapon, we must choose the effect
from the list. You know what! I’ll deviate from the purpose of my lesson and teach you how to make these same enchantments, just in case)
In general, go to the section: Magic > Enchantment
Open BoundBattleaxeEnchantment and enter:
I gave the id to aaaFantomZach1
Name: Pacification of the violent
Type: Enchantment.
Fig.2 
We delete all effects in Effects and right-click New and the window appears: Effect Item
Fig.3 
In Effect I will select ParalysisFFContact
In Area: 0, since we only need one person, although you can put 1000 and everyone around will be paralyzed)))
In Duration 18s
That is, this is a paralysis that knocks out the target for 18 seconds. You can do it for days, well, that’s already cheating)))
Well, click ok, then ok again, and go back to the Sword of Blades (AkaviriKatana), the enchanting lesson was not so detailed, because this is a weapon lesson and I don’t want
will be scattered, well, let's put ours from the list: aaaFantomZach1
Correct the ID to yours, I set it: aaaFantomiWeapon001
Name: Test weapon, click ok, and again and go to our new created weapon under ID aaaFantomiWeapon001, that's all.
The lesson is over)))))) Am I kidding? Yes, of course I’m kidding! What kind of lesson is this if I didn’t explain anything in it!
So we settled on Enchantment: This is the number of charges in your enchanted weapon. These charges are replenished with the help of soul stones, in general I set 5000, and from the very
At the beginning, the weapon will be completely filled with 5000 points of charges.
Next Value: The price of a weapon for which we can buy and sell it weapons in general red price roughly speaking, but the price is influenced by your skills in the game, so the price indicated here is not
will be accurate when buying or selling.
Template: It's simple, this is the Template by which all the data of your weapon will be configured! You can select from the list of standard weapons and all parameters will be replaced with the same one
weapons that we chose from the list, but we make our own so we won’t need it.
Let's look to the right: Skill: This is a skill that is associated with this weapon. That is, it is this skill that will affect this weapon and will develop when handling this weapon, but usually
if it is a two-handed weapon, then it is set to two-handed, since it should develop this particular skill. Even further to the right is Equip Type: (Wearing type) here we indicate how yours will be worn
weapons to those who take them. The list includes:
None – has no wearing types, i.e. cannot be worn
BothHands - The actor holds with both hands
EitherHand - The actor holds with either hand
LeftHand - The actor holds with his left hand
Potion - The actor holds it like a potion
RightHand - The actor holds with his right hand
SHIELD - The actor holds it like a shield
Voice - Actor uses as a voice
Of all this, only BothHands and BothHands are used in weapons
We have a one-handed weapon and I put: EitherHand (It can be held with either hand)
Below: Damage per second - The editor itself calculates and displays this figure.
Well, let's look at the section: Flags (Flags)
NPCs Use Ammo: (NPC uses arrows) Usually NPCs do not use arrows in their inventory. When this flag is set, he will only use them for this weapon.
Ignores Normal Weapon Resistance: No longer used.
Automatic: Not applicable.
Can't Drop: Weapons cannot drop when the NPC wearing them or the player dies. Typically used for weapons that are built into the actor or armor. For example, Dwemer
cars or giants.
Not Used In Normal Combat: prevents the NPC from using this weapon if it is not specified in the weapons used or equipped, i.e. if he does not have it himself
equip it will simply be lying around in your inventory.
Non-hostile: An NPC who was attacked by this weapon does not consider it to be an aggression actor, and it will not force a fight.
No Jam After Reload: Not applicable.
Minor Crime: Defines NPC attacks using this weapon as minor crimes (as opposed to violence or felonies).
Hide Backpack: Weapons are hidden in inventory
Playable: The player can see weapons in another NPC's inventory. If unchecked, the weapon is invisible to the player and cannot be used.
Player Only: Weapons are only for the player, NPCs will not use this weapon, and they will not pick it up either.
Bound Weapon: Allows you to use a magical weapon effect
Well, to the right we see Description - This is a description of the weapon itself that will be visible in the game.
Keywords is keywords which can be used in script functions or determine in which section this weapon will be crafted.
Below are Scripts - scripts that are installed on this weapon.
Okay, now let's look at three large sections:
1.Game Data
2.Art and Sound
3.Rumble
Let's start with the first one: 1.Game Data
Weight: The weight of this weapon, i.e. how much it will weigh.
Reach: The range of the weapon, determined for melee weapons. That is, swords, daggers. According to standard 1, it is defined as 141 in-game centimeters (1 meter in the game). This standard
is registered in the game settings (in the editor) in gamesetting and the function: fCombatDistance is responsible for it.
Speed: The combat speed of these weapons is standard 1, if it’s more, you’ll swing the weapon faster, this is necessary if you have a dagger, and if the weapon is large, then set it to less than
1 to make it realistic.
Sight FOV: The angle of view when using sighting on bows. This is done by zooming in inches.
Damage: Weapon damage, the damage this weapon causes in one hit (1 second).
# Projectiles: The number of hits from one hit. In general, if you set it to 5, then hitting the NPC 1 time will receive the same damage as you would hit 5 times.
Base VATS To-Hit Chance: Does not apply.
Crit % Mult: Modifier to critical strike chance. Usually set to one. If set to zero, the weapon will not deal critical hits when hit.
Stagger: The amount of time the enemy is stunned per hit. 1.0 value plays the full animation of stunning the enemy. The stagger itself can be reduced by a whole row
various factors, and a value above 1.0 is meaningless.
Crit Dmg: Critical damage is additional damage for a given weapon and it is not a multiplier, but it is simply added to the main damage, and also if a critical one is triggered
damage then the armor protection is ignored and the damage is applied as it is set + of course critical damage =)
Below we see:
Burst Shot and Long Bursts
They are not used in the game, but essentially Burst Shot is an explosive shot, and Long Bursts are burst shots, I am inclined to think that this function was left over from the GECK editor
Fallout 3. So don't pay attention to these squares.
On the right, a little higher we see Resist - the function is not used in the game, but I will explain its action. When blocked, this weapon will resist from:
DamageResist - Resists damage
ElectricResist - Resists electrical attacks
FireResist - Resists fire attacks
FrostResist - Resists frost attacks
MagicResist - Resists magic attacks
PoisonResist - Resists attacks with poison
On Hit - Formula for one hit. According to the standard (Normal formula behavior):
Normal formula behavior - Standard formula.
Dismember only - Only dismembers on impact
Explode only - Only explodes on impact
no dismember/explode - Does not dismember or explode
Below we see Range
Min Range: Tells the AI fighting with this weapon that it should not be closer than the set value.
Max Range: Tells the AI fighting with this weapon that it should not be further than the set value.
Fixed: Tells the AI fighting with this weapon not to use the fighting style for this weapon.
Look below where:
Crit Effect: A "spell" that is applied to the target when critical hit. Only the effect itself should be specified.
On Death: If enabled, the critical effect is applied only before the target dies.
Embedded Weapon: Applies if the weapon is embedded in a part of the creature. Not used in Skyrim.
Model
Model: The model used for this weapon when it appears in the world or when used by an NPC. Here we indicate our model.
1st Person Model Object: The weapon model object used for this weapon for the first person. To install this model you need to go to the World Object > Static > Weapon section

Create a new one: 1stPersonaaaFantonWeapon1
We indicate the model, leave everything else as it is.
Now we can open our weapon and select this model from Static in the 1st Person Model Object
Inventory image: The image displayed in the inventory.
Message Icon: An icon that appears as a message when a hero purchases a given weapon.
Impact Data Set: Determines how this weapon affects various types of material. For example, I hit iron sword sparks on stone, chips on wood =)
Block Bash Impact Data Set: Determines how this weapon affects blocking attacks.
Alternate Block Material: Determines what alternate effects there are when blocking.
Add Destruction Data: Add object destruction data (Not used)
Has Scope:
Used if the weapon can zoom in the target zoom mode.
Target NIF: NIF File that applies the effect.
Effect: Shader effect applied to the target or view when zooming is possible.
Well, now let's move on to the window: Animation
Attack Multiplayer: Speeds up or slows down the attack animation. Standard 1.00
Don't Use 1st Person IS Animations: Used to hold a weapon using zoom in 1st person mode.
Don't Use 3rd Person IS Animations: Used to hold a weapon using zoom in 3rd person mode.
Attack Shots/Sec: How many shots per second or strike animations, set to 0 by default.
Attack Anim: Weapon attack animation.
Anim Type: Animation type, there are 9 in total:
Bow - Animation of using a bow.
HandToHandMelee - Animation of hand-to-hand combat.
OneHandAxe - Animation of using an ax with one hand
OneHandDagger - Animation of using a dagger with one hand
OneHandMace - Animation of using a mace with one hand
OneHandSword - Animation of using a sword with one hand
Staff - Animation of using a staff
TwoHandAxe - Animation of using an ax with two hands
TwoHandSword - Animation of using a sword with two hands
Let's move on to sounds (Sound)
Attack Sound - Attack sound
Idle Sound - Sound when the weapon is idle, or perhaps if you just wave it in the air.
Equip Sound - The sound when equipping or picking up this weapon.
Attack Sound (2D) - Attack sound (2D)
Attack Loop - Attack sound
UnEquip Sound - The sound when sheathing a weapon taken in the hands or simply inside the equipment.
Attack Fail(No Ammo/Melee Miss) - The sound of an attack if there are no arrows (bow)/or a melee attack with a sword, for example.
Pickup Sound - The sound of picking up weapons
Putdown Sound - Sound when throwing a weapon
Detection Sound Level:(the volume level of all these sounds is higher)
Normal: Normal
Silent: Quiet
Very Loud:Very loud
Left monitir strength: Sets the noise strength for the left side of the controller.
Right motor strength: Sets the noise strength for the right side of the controller.
Duration: (Duration of noise)
Pattern (There are no patterns, so this function does not work and is not used)
Alternate: The function is not used.
That's basically all.
The lesson was written by Phantom. Any copying of information is only with the permission of this user!