World of tanks sight installation. How to enlarge the sight in World of Tanks for comfortable shooting
Advanced players know: without mods, a game is not a game. And the most important addition, which is installed over time by all players, concerns weapon equipment. Let's talk about how to install a sight in tanks.
Single modification or modpack?
You can work on your sights by downloading a modpack - a package of various mods that make complex changes to the game, or install the mod point-by-point, without unnecessary additions. Thus, you can install original equipment on the tank, taking the game to a new level. The most commonly installed sights are:
- Sniper
- Arcade
- Artillery
- Marakasi for World of Tanks 0.9.17.0.2.
- Breakthroughs
- With recharge indicator
- Minimalistic Sights
Some of them have the possibility of additional customization for the owner - to do this, you need to go to the options in your account.

Detailed and step by step
If you have decided on the choice of the desired modification, download the archive file to your computer and save it in folder D (or another place convenient for you).
- Remove the downloaded file from the archive, that is, unzip it (with any usual program).
- In the opened archive files you will find a text file in which your further actions will be described, and two swf files for World of Tanks.
- Open the document with the text on installing the modification, find out where you need to copy the swf folders.
Important: if problems arise at this stage, you can solve them by copying the path and pasting it into the “My Computer” address bar. In this case, the folder will open automatically.
Paste the copied swf files into the World of Tanks folder along the appropriate path. If the required folders do not exist, you will need to create them yourself.
To destroy enemy tanks, shells must hit the enemy. In the initial stages, each shot causes serious damage to the enemy due to the weak armor of the hull. But at high-ranking levels, it is impossible to win victories without targeted fire. You have to zoom in and look out for weakly protected areas of the enemy through the optics in order to penetrate the armor and inflict critical damage.
When the player is zooming and aiming, it is important to maintain attention and stay focused without paying attention to the little things. To do this, players independently configure and install aiming in tanks.
In-game settings

The setup menu also changes the arcade. 12 adjustable parameters visually change aiming. Using the sliders, the appearance of arcade and sniper aiming changes:
- Indicator;
- Center marker;
- Information circle;
- Weapon marker;
- Transparency of each element.
If you are looking for how to increase the scope in World of Tanks and set the zoom ratio through the settings, then you will be disappointed because some of the parameters cannot be changed. Nevertheless this problem solved with the help of mods.

How to install a sight in World of Tanks
To set sniper zoom manually and change appearance use two ways:
- Install the assembly of modpacks (Jov, PRO Tanks, Amway921 and others);
- Download as a separate file.
In the first method you will get best options interference along with a set of additional modifications that load the computer. If you have low FPS, use the second method to avoid freezes and lags.
The World of Tanks game, although it belongs to the category of “client-online toys,” easily allows you to change the interface and modify the original client with various add-ons. New screensavers, hangars and skins, various mods in the form of improved sights, a comprehensive XVM mod, and a “smart” mini-map give the gamer a slight advantage over other players. For example, the “deer gauge” allows you to identify players with high efficiency in battle, and the improved damage panel records the type of projectile that hit your tank. As for sights, their functionality depends on the mod developer. How to change the sight in World of Tanks?
The standard sight gets better and better from patch to patch. You can configure it as follows. Open “Client Settings”, go to the “Sight” tab and customize it in your own way. You can change the gun's crosshair, the central marker, the transparency of certain elements of the sight, as well as the aiming circle and reload timer. You can only customize two types of standard sights: sniper and arcade. The artillery sight cannot be changed through the standard settings.
This is where the functionality of the standard sight ends. It's time to think about installing an improved scope. Among the huge number of sights, Jimbo and HardScope sights are considered popular, as well as minimalist sights from Flash and Amway.

You can find these sights on the Internet, on sites dedicated to the game World of Tanks. Installing the sight will not take even a couple of minutes. So, how to change the crosshair in WoT?
First, download the sight in the archive and unpack it. After which you will need to go to the game folder on drive C and open the res-mods folder in it. In res-mods, select the folder with the name of the current patch, create a gui folder in it, and a scaleform folder in gui.
As a result, you will get the following path: C:/World_of_Tanks\res_mods\patch number\gui\scaleform. We transfer the flash files from the archive to the scaleform folder. Congratulations, the sight in your client has been changed!

Some scopes, like the HardScope, have a slightly different installation method. As a rule, in each archive with a sight there is a mini-instruction that contains information about installing the sight.
Improved sights have a whole range of additional functions. For example, they display the reload time and condition of the gun, the number of shells in the ammunition load, the armor penetration scale, the range to the target, etc.

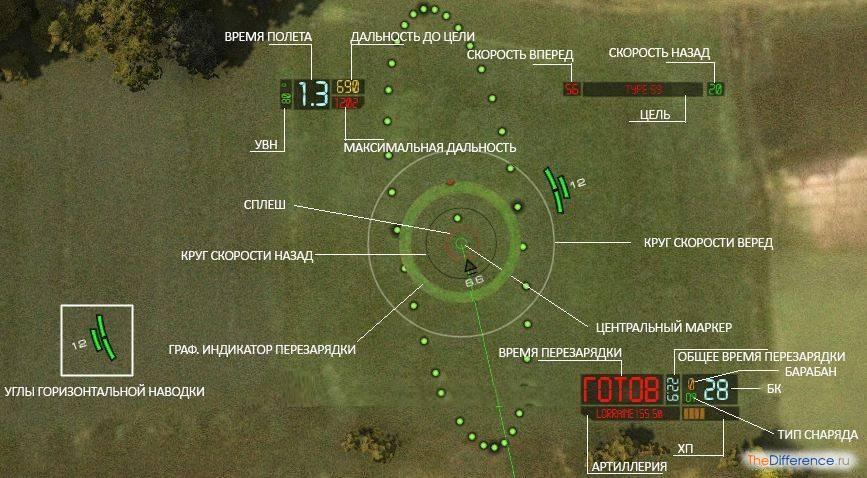
Artillery sights have added functions such as displaying the flight time of a projectile and its angle of entry, the splash radius of a high-explosive projectile and horizontal aiming angles.
Most archives with sights have several types of sights at once, which allows you to change artillery, arcade and sniper sights at once.
In the last article we talked about what is needed and this is the primary condition for comfortable game. But no less important is the correct setting of the game parameters.
Correct settings are the key to a comfortable game! Now we will briefly look at all the game settings and pay special attention to graphics settings.
1. General settings
The “Game” tab contains general settings.

In the “Chat” section, you can enable message censorship so that stars are displayed instead of swear words (recommended for children). Here you can disable spam, invitations to a platoon, friend requests and messages from those who are not in your contact list (friends). Personally, I'm fed up with these messages, I turned off the chat altogether and am enjoying the game
In the “Types of random battles” section, you can disable “Encounter battle” and “Assault”. These modes use the same maps as in random battles, but the location of the bases and victory conditions have been changed. In the “Encounter Battle” mode, there is one common base and the team that captures it or destroys all opponents wins. In Assault mode, one team defends the base, the other defends. To win, the Defenders must prevent the base from being captured and at least one team member survive. To win, the Attackers need to capture the base or destroy all opponents at any cost. Personally, I don’t like these types of fights, but you can try them for a change and see if they suit your taste.
In the “Combat Interface” section, you can turn off the effect of optics (the green background in the sight) so that it does not spoil the picture, and turn off the display of the vehicle that destroyed you (if this makes you nervous).
Be sure to check the “Enable dynamic camera” and “Horizontal stabilization in the sniper scope” checkboxes, otherwise it’s simply impossible to shoot on the move, the scope dangles in all directions!
I uncheck the “Show vehicle markers on the scoreboard” and “Show combat effectiveness tapes” checkboxes, because I don’t see the point in them, they are just distracting.
As for the minimap options (camera direction beam, SPG firing sector and additional features), then I disable them because I use a minimap mod with advanced capabilities, which I will tell you about in the next article. This is important, if you, like me, use the minimap mod, then disable these parameters so that they are not duplicated, thereby reducing performance.
When the “Record battles” option is enabled, small files (replays) will be recorded in the “replays” folder, which is located in the game folder, which can then be viewed. This almost does not affect the performance of the game and you can easily share them with friends or upload them to the site “wotreplays.ru” so that other users can watch how you bend But these are not video files, they can only be played by the game itself and stop working after exit next patch. Therefore, if you want to post a video on YouTube or save the history of your victories for posterity, do not forget to digitize the best replays after hard battles using some program for recording video from the screen (ShadowPlay, Bandicam, Fraps).
Well, by checking the last checkbox “Display distinctive marks” you can compare barrels with players in the game. Stars or notches (from 1 to 3) received in battles for great services to the homeland will be displayed on the barrel of your tank
Immediately when you switch to the Graphics tab, the screen settings are displayed.

If you have just installed the game and it is still displayed in a window, and not on the whole screen, then check the “ Full screen" and click the "Apply" button. Only after this you need to select “Screen Resolution”. If you have a liquid crystal (flat-panel, TFT) monitor, then choose the maximum resolution and leave the frame rate at 60. If you still have a fucking box of a picture tube (CRT) monitor on your desk, then a resolution of 1280x1024 with a frequency of 85 Hz is usually suitable for it ( or 75 Hz). Click “Apply” and if everything is displayed normally (not stretched or flickering), then this is good. If you cannot find the resolution you need or the image appears stretched, then try also changing the “Screen Aspect Ratio”.
In the Graphics Quality field, you can manually select low, medium, high, or maximum quality. This will install the appropriate set of settings, which we will talk about next. If you are not playing on a calculator (a very weak laptop), then make sure that the “3D render resolution” slider is set to 100% and uncheck “Dynamic change”, otherwise the picture in the game will be blurry.
It is better not to enable the “Vertical Sync” option, as it negatively affects performance. This is only required in case of noticeable frame tearing and is applicable on high-end gaming PCs. The “Triple Buffering” setting is needed to improve the performance of the video card when “Vertical Sync” is enabled, but it affects the performance of the processor that performs this buffering.
The Anti-aliasing parameter improves the picture, it becomes softer and more natural, but this significantly loads the video card and is designed for powerful gaming PCs. In this field you can select various modes antialiasing from lighter (FXAA) to quite heavy (TSSAA-HQ).
“Viewing Angle (FoV)” sets the location of the camera relative to your tank. That is, the angle at which you will look at it. The default is set to 95 degrees and "Dynamic FoV" is disabled. Nobody really complains about these settings, so you can leave everything as it is. If you want to experiment, then you now know how everything was, so that you can put it back in place later
The “Gamma” parameter adjusts the brightness, but don’t touch it in vain, it’s better to reset your monitor to default settings, since the game is well calibrated.
“Color filter” is a gourmet option that imposes a different background in the game, similar to the effects in cameras. I tried it, it’s glamorous but useless...
Well, “Color Blind Mode” is intended for people with vision problems.
On the same “Graphics” tab, if you click on the “Advanced” button, the graphics quality settings will be displayed.

At the very top there are the already familiar “Recommended” button for automatically selecting the optimal parameters, the “Graphics Quality” field for setting a set of settings from low to maximum, the “3D render resolution” slider, which should be at 100%, and the “Dynamic change” checkbox. , which should not have a check mark.
As graphics quality increases, the frame rate per second (FPS) decreases. It is believed that a person sees 24 frames per second and for the smoothness of the picture it is desirable that the game produces at least 30 FPS. But from my own experience I can say that normal game dynamics start at 60 FPS.
What is the difference between low dynamics and high dynamics? With low dynamics, your tank drives like a Zhiguli (it just stalls), although maybe like a BMW. I have felt this more than once and you will feel it if you follow my advice! Extras (majors) have powerful computers that, even with high graphics settings, produce decent FPS (100 or more). Therefore, they feel the dynamics in the game much better, the machine subtly reacts to every fiber of the soul and they play more efficiently. And on a fast ST or LT without dynamics it’s generally sad... I’m not even talking about supercomputers that are used in e-sports. This is exactly what they are needed for - for dynamics.
An online game is not a single-player shooter, and what is important in it is victory over a live opponent, and not sluggish participation in a meat grinder with bots. Then the game gives that desired moral satisfaction after hard work, and not frustration and a bottle of vodka. Convinced, no? Then read on
I have a mid-range gaming PC and it runs the game on maximum settings graphics, producing 40 FPS. At high settings it produces an average of 60 FPS. In the settings window that I provided above, you can select the graphics type “Standard” or “Enhanced”. So, despite what the hardware allows, I have long preferred to play on standard graphics, without any extra extras.
Just like that, simply and angrily, yes. But what a pleasure the game brings when you race on a bachata (or at least a four-wheeler) at a speed of 100-150 FPS! And there’s not a speck of dust in your eye, no clouds of smoke and rising earth from a T92 shell that fell nearby, no scary grass painted schoolchildren for ice cream highly paid designers, no fog that prevents you from aiming the T95 hatch from 500 meters, no other nasty graphic innovations that turn a BMW into a Zhiguli and prevent you from playing effectively.
Many computers run standard graphics much better, FPS is many times higher, and nothing prevents you from manually setting the available sliders to high parameters, in which the picture turns out quite neat, clean and dynamic!
I also recommend turning off grass and effects in sniper mode(they are very annoying), the transparency of the foliage (makes the game even cleaner and faster), tracks and effects from under the caterpillars (you never look at them at all). “Quality extra. effects" it is better not to set it above average or turn it off altogether, since they also interfere (for example, when an artillery shell explodes nearby). It’s better to uncheck the “Dynamically change the quality of effects” checkbox; there’s no need for the graphics in the game to float.
In addition to high dynamics and picture purity, you will get some nice bonuses, which you will notice as the game progresses (for example, due to the transparency of the water, the bottom topography is clearly visible and where you can drive along it). Try it, play for a while and you will notice that you have become more effective at playing. The main thing is not to rush forward on the wings of FPS
I don't promise anything, because I don't eat ties or caps. But if you still don't like the standard graphics, just change the settings. The screenshot below shows the settings for improved graphics, providing an optimal quality/performance ratio for an average-power PC.

Download detailed description settings for improved graphics, how they affect image quality, what load they put on the video card and processor, you can see in the “” section.
And also, if you need to restart the game to apply the settings, a corresponding message will appear. In any case, I recommend restarting the game if you make major changes to graphics settings.
When we get to mods, there are still interesting opportunities to make the picture cleaner and the sight more stable
If, despite all the settings, your computer is sorely lacking in performance, consider installing new level GTX 1050 Ti or 1060.
MSI GTX 1050 Ti graphics cardHere is a screenshot of the settings in the Sound tab.

Everything seems clear here, so I’ll just add a little personal experience.
I turn off the music right away, it interferes with the game no less than the improved graphics
If you are not using a microphone in team battles, then turn off voice communication by unchecking the only checkbox. Turn it on if necessary. Communication works on the principle of a walkie-talkie - you press the microphone activation button (Q), say, release and listen to others. Anyone who holds the button for a long time pollutes the air with noise from his microphone (computer, apartment).
The microphone must be connected before starting the game. If your microphone is not always on, then after connecting it it is better to restart the computer, otherwise it may not work or work poorly. First check through the Skype testing service that the microphone is working properly, you can be heard well and there is no strong background noise. If necessary, increase (or decrease) the microphone sensitivity in the system settings (in Windows 7: Control Panel\Hardware and Sound\Manage audio devices\Recording).
Then launch the game, enable voice communication and select your microphone in the appropriate field. The Player Voice Volume setting affects how you hear others. The default “microphone sensitivity” should be sufficient; at level 70 and up, your voice may begin to hum and cause discomfort to other players, do not overdo it with this parameter and ask your comrades not “How can you hear me?”, but “Is it too loud?” ?. I usually reduce the “general ambient volume level during a conversation” to 50, this muffles all the sounds of the game at the moment when a comrade addresses you and you don’t have to ask him again.
Well, the last, but not the newest feature is national voice acting. I usually leave the standard one, because who knows what the crew of a Chinese tank is babbling there, but it’s worth a try, it’s a challenging thing
And yet, there is some other “Start test” button, which I just noticed. Try it, tell me later in the comments
In the mods we will also install sound on the light bulb, what a song!
With the settings on the “Management” tab, everything is even simpler.

But I will still give some advice. I recommend lowering the sensitivity sniper scope and increase the sensitivity of artillery. Set it approximately like in my screenshot. This will give higher aiming accuracy when you are in a tank, since with high sensitivity, especially at medium and long distances, it is difficult to target enemies, the sight moves too quickly. And when you’re on the art, on the contrary, you’re tired of dragging the scope back and forth across the entire map with low sensitivity, and the mat gets erased...
Don’t even think about turning on any inversion, only plums will work
And one more good piece of advice. If you have a mouse with additional buttons, then you can assign a specific consumables cell to one of them. In cells 1-3, the types of projectiles are switched and there is no need to touch them. But in cells 4-6 there may be manually activated consumables. For example, I install a fire extinguisher in the first cell, which corresponds to key 4 on the keyboard. Instead of key 4, I long ago assigned the side button on the mouse in the game settings. This allows you to quickly put out a fire in the event of a fire, rather than searching for the right button on the keyboard while the ammunition explodes. In addition, if there is an increased risk of fire, for example, an AMX 1390 came aft of you and is glad that it got to the soft one, then it won’t hurt to click at that time side mouse button for prevention! Works like an automatic fire extinguisher, but costs 7 times less
In the next article about mods, I will tell you how to assign several keys to one action and shoot more accurately! And, if you mess up the control settings, there is a “Default” button there
Go to the “Sight” tab.

Well, there’s nothing left to say here. You can adjust the size and shape of the sight, which I once tried. But the default settings are close to optimal, except perhaps make the size larger. Yes, and somewhere there is a sight with an indication selected. If you point it at the enemy's VLD (upper frontal part), it turns red, if you point it at the NLD (you can guess it yourself), it turns green. In general, it makes it clear whether your projectile can penetrate armor in this place. Red - no, green - yes.
But don't bother with this, as in the article about mods we will install more convenient sight with the correct indication taking into account the angle of entry of the projectile!
Well, I just have to say that on this tab there are two more pads (pun intended) for setting up a separate arcade (3rd person) and sniper sight (in optics).
Here you can customize various icons above the tanks.

I somehow made the optimal settings for myself and they were saved, since now most of the settings (except for graphics and sound, in my opinion) are stored on the server and are pulled up from it again, even if the game is completely reinstalled.
There are also pads for setting up markers for allies, enemies and destroyed vehicles. For allies, they are the same there, but for destroyed ones, only the model of the vehicle for reference, the rest is disabled so as not to interfere with the screen.
I’m telling you everything honestly, but I still hope that you will install the right mods and you won’t have to configure anything manually.
8. Removing unnecessary files
And finally, a little more useful information. You can significantly reduce the amount of disk space a game takes up by deleting all files from the Updates folder.

This folder contains temporary files that are downloaded during game updates. The developers themselves confirmed that these files are absolutely unnecessary and can be safely deleted. This is especially true for SSD drives that have a small capacity. For example, this folder took up 13.4 GB for me! For which she was sentenced to destruction without the right of restoration
9. Conclusion
To summarize, I want to say the following. If you want to win, forget about the special effects and set up the game well! After all, defeats do not bring any pleasure, but only irritate and leave a feeling of dissatisfaction!
10. Links
Below you can download a detailed description of all screen and graphics settings, how they affect image quality, processor and video card performance, with recommendations for the right choice parameters.
Headphones A4Tech Bloody G430
Keyboard A4Tech Bloody B254
Mouse A4Tech Bloody A90
Tens of thousands of wizards have already made their own mods, skins, icons and all sorts of additions to
World of Tanks - multiplayer online game with hundreds of thousands of players. It has become so popular that all other games pale in comparison. Tens of thousands of wizards have already made their own mods, skins, icons and all sorts of additions to this game. But how to install them correctly? Let's learn once and for all. So that there are no questions in the future - How to install a mod or sight in World of tanks?
First, download the mod from our website:

Unpack the archive with the mod (right mouse button on the file, before installing the archiver or other similar ones):

Select the files and copy:
Go to the folder with the installed World game of Tanks. ALWAYS copy all new mods and game improvements to the res_mods folder - otherwise you will lose the ability to restore the original game files.
In version 0.9.5, go to the World_of_Tanks/res_mods/0.9.5/ folder and create a folder depending on the object: /gui/flash - for sights, panels, lighting, minimap, icons and other mods associated with visual effects in the game
/audio/ - for voice acting, sound, music and everything related to sound visualization in the game
All other modifications are installed strictly according to the instructions inside the archives.