How to hold drumsticks correctly. Hand placement, landing, sound production
So where does drumming begin? Of course, from the fact that you need to pick up the sticks))) A natural question immediately arises - how to hold them correctly? Let's find out!
Strictly speaking, there are only two main types of gripping sticks (grip - gripping, setting). They are described very well and in detail in the drummer video school Jojo Mayer's “Secret weapons for modern drummer”– if you come across it, be sure to download or buy it, a thing worthy in all respects. I saw this school only on English, so I’ll tell you in a few words what we’re talking about.
So, there are two types of stick gripping - symmetric(matched grip) and traditional(traditional grip).
– in this case, the left and right hands hold the chopsticks in the same way.
There are three options for symmetrical positioning: German (palms facing down), French (thumbs on top, palms almost perpendicular to the floor) and American (intermediate position).
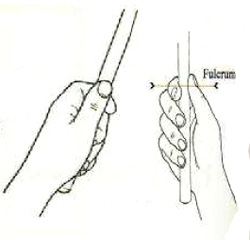
Before you take the stick in your hands, you need to find the balance point of the stick - 10-12 centimeters from the thick end of the stick - the grip point at which the stick has the freest rebound. At the balance point you find, hold the stick between the pad of your thumb and the second phalanx of your index finger. The formed clamp in the fingers is called a lock (fulcrum) - a fulcrum for free rotation of the stick. You should not clamp the stick too tightly - you need to avoid excessive muscle tension, giving the stick some freedom. With your remaining fingers, lightly grasp the stick - you don’t need to squeeze it too hard, but at the same time, your fingers should constantly touch the stick, and you shouldn’t move them completely to the side.

Also pay attention to the gap between the thumb and index finger - if there is one, then the hand is not clamped. It is recommended to study the German production first as a basic one, and then move on to the rest.
- this is when the left hand holds the stick differently than the right (for left-handed people it’s the other way around). This type of performance originates in the traditions of marching drummers - the traditional grip was used due to the sliding of the drum hanging on the shoulder to one side.

With this grip, the leading hand (right for right-handed people) holds the stick, similar to the symmetrical grip. Relax your weak arm, bend at the elbow and open as if you were holding a tennis ball. Place the stick on the connective tissue between your thumb and forefinger to create a lock. The index finger is placed on the stick with the upper joint on top, the middle finger must be extended from above along the stick in a straight position so that it remains relaxed. The support for the stick is the phalanx of the ring finger, the little finger is tucked. The palm looks to the side; it is important not to open it upward. The hand is in line with the forearm, without kinks to the sides.
In all grips except the American one, the angle between the sticks is approximately 90 degrees, in the American one it is slightly less.
That, in essence, is all I wanted to say about the types of stick grips. Let me emphasize once again that this article should be taken as recommendations - for correct positioning It’s better to turn to a competent teacher. Ultimately, the main thing is that you feel comfortable playing, strive to make your drumming as free, relaxed and easy as possible. Good luck!
It will take years of hard training. With regular practice, you will move from mastering simple rhythms and the ability to keep a steady tempo to complex patterns and rhythms. Skip to step 1 to find out where to start.
Steps
Part 1
Getting to know the toolTransfer the pattern you played on your knees to the drum kit. Play 8th notes on the hi-hat, hit the 2 and 4 counts with your left hand, and hit the bass drum on the 1 and 3 counts.
- Count out loud and loud. This is not necessary when you are playing, but when you are practicing it will be very useful.
- To get comfortable behind the kit, hit whatever you like on counts 2 and 4 instead of the snare drum.
- Try to get the best sound from your rhythm, smoothness, and don't forget to count out loud.
Pay attention to your left leg. Learn to close the hi-hat while you play it with your hand. You will get a short sharp sound. Most drummers use a closed hi-hat sound.
- Play 8th notes with your right hand. With your left hand, play the snare drum on 2 and 4. Try dropping the hi-hat on different beats to see what effects you can achieve. You can play with a constantly open hi-hat, you can open it slightly for a while, you can hit the edge of the cymbal or the cup.
Develop your foot technique. Letting go of the hi-hat and strumming the bass drum at the same time will help develop coordination and strengthen your muscles.
- Practice playing with your foot and right hand at the same time while your left hand improvises, and with all parts of your body at the same time. This will help you learn to control your shots better.
Change the rhythm. Play the same rhythmic pattern, but instead of hitting the snare drum on the 2 and 4 counts, hit the hi-hat with your left hand. As you swing with your right hand, move your left hand to the snare drum. You should play the snare drum with your left hand between hits of the hi-hat.
- During the exercise, do not forget to count “One-yes-and-yes-two-yes-and-yes-three-yes-and-yes-four-yes-and-yes-”, continuing to play “One and two and three and four and" on the hi-hat, but playing the snare drum with the left hand on "-da-".
Part 4
Develop coordination of movementsDo your research rudiments for snare drum . Basic "single roll" and "double roll" are absolutely essential parts of any drummer's game. A single shot differs from a double shot in that in a single shot you strike each subsequent blow, changing your hand and making a new swing, and in a double shot you let the stick bounce off the plastic and make two strikes in one swing.
- Playing in twos allows drummers to develop tremendous speed and play incredible patterns. All basic patterns using single strokes, twos, triples and fours are presented in the book “26 Basic American Rudiments”.
Learn to play with both feet. It may be challenging and make you rack your brain, but playing the drums means constantly learning something new. Instead of alternating single kicks, try doing two, three, or four kicks while performing a different pattern with your hands.
- At the same time, do not forget to count the 8th notes and play the hi-hat with your left foot on the 4th or 8th weak beats. To play within a standard rock beat, play 2 and 4 on the snare. At the same time, lead the rhythm on the ride cymbal with 8 notes with your right hand; if there is no ride, play along the hoop of the snare drum.
Play the bass drum with your right foot. Experiment with your bass drum pattern while keeping the rhythm with the rest of your body. This is where the fun begins. But don’t worry if it doesn’t work out right away, over time it will become simple and familiar. This is a matter of coordination of movements and the ability to play your own pattern with a separate limb. Unfortunately, it doesn't exist fast way learn this. Just concentrate and practice. Sometimes it helps to play the part of the game that doesn't work out separately.
Part 5
Learn more complex rhythmsLearn to play triplets. To learn how to play fourth triplets, you need to start from the second notes. Count 1-tri-ole for every other note. For eighth note triplets, everything is the same: three notes are counted for every fourth note.
- Triplets are not used as often in rock beats, but they are an excellent fill tool and are often found in school orchestra scores. A triplet is when you play 3 notes instead of 2. You can play 4th, 8th, 16th and 32nd triplets.
- There are many great-sounding 8-note triplet patterns out there. You need to count “[One-tri-ol][Two-tri-ol][Three-tri-ol][Four-tri-ol]” or in any other suitable way. Play this pattern with a metronome, playing each click count and mentally dividing each count into 3 parts.
Learn to play 16th notes. These are the notes you already played when you played the hi-hat exercise. They are considered "".
- 16th triplets are considered "".
We count the 32nd: « »/
- It is possible to play 32nd triplets, but the complex structure of the subdivisions makes it very difficult to pronounce the count out loud. If you want to hear what 32nd triplets sound like, listen to “Hey Joe” by Jimi Hendrix. This is a very difficult time signature to play, as it requires the ability to play very quickly, while it is necessary to distribute accents across the setup in unison with the main rhythm.
Remember: Each subdivision has its own place in time, and the downbeats must clearly coincide with the click of the metronome. By playing fourth beats on a metronome, you won't have any difficulty saying the count when you move up to higher tempos.
Pauses mean that no instrument plays during that unit of time. Listen to your favorite song and count the 16th or 8th notes, during many transitions or fills you will find places where no instrument is playing - these are pauses.
Learn to feel the different subdivisions and rests by playing only the snare drum. One of the goals in this exercise is to punch with equal force with both hands. Accented strokes should sound louder than normal strokes, regardless of whether you play them with your right or left hand.
- An accented shot is a shot that sounds louder than a regular roll shot, sometimes performed with a rim shot. Accenting adds dynamics to music. In musical notation, accents are indicated by the mathematical greater-than sign (>).
Try doing different fillings for the “3 + 4 +” abacus. Some things will sound great and some won't. The simplest fills are rolls on the snare drum. You can try alternating hitting the snare drum with your hands and hitting the drum with your foot. Two on the small side, then two on the barrel. As long as you keep the tempo and play smoothly, you can play anything!
1. Symmetrical grip (or parallel/pair)
This is the most common option, so let's look at it first. It is divided into the following options: German, French and American.
Take the stick about 12 cm from its thick end (here the stick should have a free rebound), holding it between the thumb and forefinger, with medium force so that there is no strong muscle tension, and lightly grasp the stick with the remaining fingers. There should be a gap between the thumb and index fingers, which indicates that the hand is not clamped.
The German grip is a type of grip of the drumsticks in which the palms face down. It is mainly used by drummers who play in symphony orchestras. With this grip, the hand moves freely up and down, allowing you to easily play rudiments with different dynamics.
American takeover- this is a type of grip of drumsticks in which the hand is turned clockwise by about 30-40 degrees. This grip makes it easier to move your hands around the drum kit while still maintaining power from your playing.

French capture- This is a type of grip of drumsticks in which the thumb is on top and the palm is almost perpendicular to the floor. It was invented for the convenience of playing the timpani. Excellent for playing single fractions on cymbals, where, unlike playing on drum heads, the bounce is too poor.

2. Traditional grip (or classic)
Initially used by military drummers so that the drum belt would not interfere when playing while standing. It is a classic grip for playing jazz.

The right hand (for left-handers - the left) holds the stick with a symmetrical grip, and the left hand (for right-handers - the right) bends at the elbow and opens, then places the stick on the fabric between the thumb and forefinger, forming a lock. Next, the index finger is placed with the upper joint on the stick from above, the middle finger is extended from above straight along the stick, the phalanx of the ring finger serves as a support for the stick, the little finger is tucked. The palm does not open up, it looks as if to the side, the hand is in line with the forearm.

Now you know all the possible options for gripping drumsticks, and you can calmly choose a grip that will allow you to play more easily and freely. And the main thing is that with the chosen option you achieve the desired sound production and can play technically.
Unfortunately, for certain reasons, there is no established terminology in the Russian language dedicated to playing percussion instruments. I propose to agree on the translation of the relevant terms and use them, at least in communication on the forum of the site - a forum of drummers.
Grip - grip, fulcrum - lock (English: “point of rotation” - the place where the stick is fixed with two fingers). For example, by Traditional grip we mean “traditional grip”, and not “traditional lock” or “traditional positioning”.
This article is mostly translated from several authoritative sources (usually classic American textbooks). You can always ask the nuances of technology on the forum of teacher Tigran Panteleev -.
There are many options for gripping sticks - each has its own advantages and purposes, depending on the music being performed, the instrument and the physiology of a particular drummer. The grip when performing fractions may differ from the grip when performing twos. Many professional drummers use different types captures within one song.
Strictly speaking, there are two types of capture:
1) Traditional (variants of the name traditional, conventional, orthodox, rudimental grip). The left hand holds the stick differently than the right (for left-handed people it’s the other way around).
2) Symmetrical grip (matched grip). The left and right hands hold the stick in the same way.
Symmetrical grip(other names are parallel and paired).
Symmetrical grip is more common. Therefore, first we will analyze the symmetrical grip and its variants: German (palms facing down), French (thumb on top, palm almost perpendicular to the floor) and American (middle position).
The first lesson with a qualified teacher begins as in a video school, drummer Jojo Mayer, where he recommends finding the balance point of the stick. The grip point at which the stick has the freest rebound (usually about 12 centimeters from the thick end of the stick - approx. website - drummers forum).
At the found balance point, hold the stick between the pad of the thumb and the second phalanx of the index finger (closer to the bend towards the nail)*. The formed clamp in the fingers is called a lock (fulcrum). Its task is to create conditions for free rotation of the stick on the created fulcrum from the phalanx (or joint) of the index finger. Everyone determines the degree of clamping of the stick for themselves in practice. The main condition is to avoid tension in the muscles, even at the cost of the sticks slipping out of your hands.
*note: There are other lock options. The index finger is closer to the other joint, which is closer to the palm. And the option that Dave Weckl, Jim Chapin, Steve Smith, Joe Morello, John Riley offer in their video schools is on the middle finger, index finger on top, thumb on the side, middle finger on the bottom.
Pick up the tip of your index finger and lightly grasp the stick with the remaining fingers. The resulting hook of the index finger helps the stick with a weak rebound. There is no need to hold the stick with your other fingers.
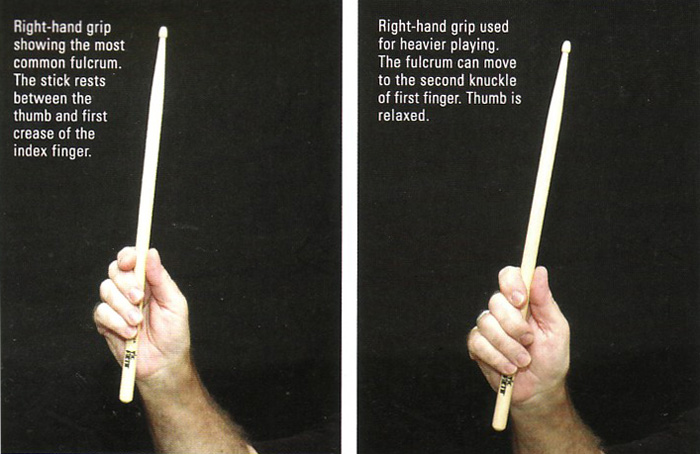
Another point that most teachers, including Dave Weikle in his video school, emphasize is to make sure there is a gap between the thumb and index finger. This is one of the indicators that the hand is not clamped. But at the same time, the option when there is no gap and the thumb lies completely on the stick is possible when playing twos and in cases where you need to play loudly and quickly. For example, marching drummers play without this gap.
 The correct position of the arms can be achieved by first lowering the arms along the body without chopsticks and relaxing the shoulders. Raise your forearms to a position almost parallel to the floor. Pay attention to the hands, there are no bends in the wrist, the hand is a continuation of the forearms, palms down. Naturally raised hands in the same (or almost the same) plane with the forearm, elbows not pinched and slightly moved to the sides.
Palms down is the so-called German grip, the most common option among snare drummers in symphony orchestras. Thanks to greater freedom in movement of the brush (up and down), it is excellent for playing rudiments in different dynamics. The German grip has been replaced by the American grip, where the hand is turned clockwise by 30-40 degrees. This option is more convenient for moving hands between the drums of the kit and gives more freedom when using the Moller technique in different dynamics, while maintaining the power of the German grip.
The third variant of symmetrical grip comes from playing the timpani - the French grip. Thumb on top, palms facing each other, hands perpendicular** to the floor. It is convenient for finger technique, therefore it is often used for playing fractions with single strokes and in playing cymbals, where the rebound is worse compared to the head of the drum. The French pick is played by such famous drummers as Billy Cobham and Simon Phillips.

** note: When they say “parallel” or “perpendicular”, they omit the word “almost”. The German grip varies from completely parallel to 10 degrees rotated, the French grip is usually not 90, but 80 degrees, i.e. slightly turned inward by the same 10 degrees.
The position of the snare drum or practice pad is also important. Adjust the height so that the top rim is 10 cm (about the width of your palm) below your navel.
Traditional grip(another name is classic).
The traditional capture has its roots in the military marching tradition. If you play a drum that hangs on your shoulder, then the drum will slide to one side - more precisely, to the right side and your left hand will hit the rim. A traditional grip allows you to carry the stick over the rim of the drum while maintaining the angle of the stick relative to the surface of the drum (this is why many traditional grip drummers tilt the snare away from themselves - approx. website - drummers forum).
The leading hand (the right hand for a right-handed person) holds the stick as if in a symmetrical grip. Bend your relaxed, weak arm at the elbow and open it as if you were holding a tennis ball. Place the stick on the connective tissue between the thumb and forefinger, forming a lock. This will be the fulcrum, similar to the lock in the symmetrical grip, around which the stick rotates.

To get a feel for the traditional grip and enhance the feeling of the lock, try this exercise: the stick is in the lock, the hand is looking to the side (Fig. 4). Apply relaxed blows by rotating the hand around the axis of the forearm (movement from the elbow).
To complete the grip, place your index finger with the top knuckle on top of the stick. The middle one is extended from above along the stick in a straight position, as far as its relaxed position allows. The phalanx of the nameless one serves as a support for the wand, the little finger is tucked. The palm looks to the side; it is important not to open it upward. The hand is in line with the forearm, without kinks to the sides.

In all grips except the American one, the heads of the sticks are above the center of the drum, the angle between the sticks is approximately 90 degrees. In the American capture the angle is less than 90.
 Use the recommendations as a guide, but you shouldn’t neglect the advice of an intelligent teacher either. There are many modifications of grips; this article shows the most common ones. The proper effect, subject to the above rules, has been time-tested by the example of many drummers. These grip options allow you to play with relaxed hands in a natural position and build up your technique.
Options for different grips have been discussed more than once on the drummers' forum - a site whose main rule was arrived at in the discussion: the absence of dogma. It is more important to understand the “physics of the process”: how the blow is struck, how the stick bounces and how to control it. The variety of grips is an attempt to control as conveniently as possible the natural forces acting on the sticks when playing. In other words, adapt to your hands the natural movement of the stick to which it gravitates and add ergonomic muscle work. The musician’s task is to freely sound the instrument, and with which fingers the stick will be clamped is probably not so important.