All codes in the game are dishonored. Dishonored safe codes
October 10, 2017 17:53
As Billie Lurk in Dishonored: Death of the Outsider, you'll occasionally come across other characters' safes, which may contain valuables such as amulets or coins. In this article, we will tell you where the safes are located, where to look for the code for the safes, and what you can find in them.
Mission 1 "The Last Stand"
Safe in Bookmaker's apartment
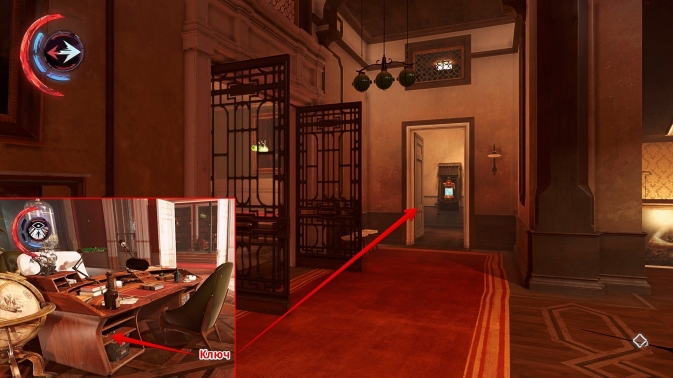
During the first mission, “The Last Stand,” you will encounter only one safe. He is in the bookmaker's apartment. You can get into it in several ways. The first is to climb through the windows. When you arrive in the Northern Campo Seta area at the carriage station and reach the stairs leading down, the office windows will be at your eye level. Climb through the pipes on the left onto the balcony, and then through the open window and the safe will be in front of you.
The second way is to enter the bookmaker's apartment from the main door. It is located in the house opposite the Albarka bathhouse, and the key to it lies in a bucket standing on the bottom shelf of the rack near the entrance to the apartment. This is written in a note hanging on the belt of the bookmaker, whom you will find in the Albarka bathhouse. The same note indicates where to look for the code to the safe. To open the safe, look at the bookshelf above the bookmaker's table and count the books. This is the combination for the safe. Inside you will find a decent amount of coins and Sokolov's elixir, which restores health.

Mission 2 "Following the Ink Trail"
Shan Yun's Safe
Shan Yun's house, where you need to go on assignment, is located next to the Spector club. There are several ways to get inside. The first is to find out the secret knock of Shan Yun's beloved, Mrs. Eolina Rey. To do this, you will have to visit her apartment above the flower shop, which is located opposite the Red Camellia beauty salon, and read the letter lying on Eolina’s desktop. The second way is to go through the passage leading from Spector's club straight to Shan Yun's house. The passage is located on the top floor of the club.
Shan Yun's safe is located on the third floor of the house in the office-library. The safe opens with a musical audiogram featuring the owner's song. You will find it in one of the display cases in the hall with Shan Yun's private collection, which is located on the second floor. The door there is not locked, but there is a security system on the floor.

The protective system can be disabled by removing the blubber tank in the dumbwaiter room next door. But here too you will need a key to the room. It can be obtained from Shan Yun's desk, which is located in his bedroom on the third floor. Or you can enter the room by taking the dumbwaiter from the first floor or descending from the third.
Having completed all these steps, feel free to take the audiogram “Undo your braids, Gloriana” from the display case and run to the audiograph, which is located not far from the safe. Play this song on it and you can take all the contents of the safe. Inside you will find: Shan Yun's key, which is necessary for the task, a bone amulet (read about where to look for the rest), as well as charges and coins.
Safe in a journalist's office
If you carefully examined Ivan Jacobi's office, you should have found a letter on the table about the journalist Christopher George. After reading it, you will activate an additional task related to the evidence against Jacobi, which you will find behind the painting in Jacobi’s office. Take what you found to the journalist, and in return he will tell you the code to his safe installed in his office. You will find coins in it.
Mission 3 "Bank Robbery"
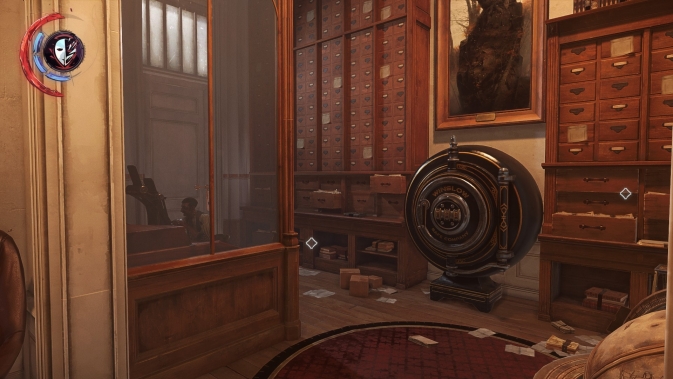
Safes in the bank archives
On the -1st floor of the courtyard of the Michaels Loans and Deposits bank there is an archive and several safes of the bank's clients. You can open three of them, belonging to Christopher George, Dr. Galvani and Morgan Yu (a cool Easter egg for the game Prey). On the way to the safes you should beware of the sentry soldier and the electrical protection on the floor. Both the soldier and the defense can be bypassed at the top.

Christopher George safe code
The code to Christopher George's safe can be found in the note "In the event of my death." You will find it in the bank employee's office, located on the top floor near the conference room. If you entered the bank from the roof, then simply go down to the top floor and go to the end. The note lies crumpled on the floor near the trash can. My note said combination 379, but it's likely yours may be different. Unfortunately, you won't find anything valuable inside the safe.

Morgan Yu safe code
Opening this safe is necessary to complete the Rags to Riches and Rags Again contract, as you need to steal the gem from it. The code for the safe is encrypted in the task for the contract itself. The combination of numbers matches the number of coins the owner had when he arrived in Karnaca. My number is 315, but perhaps it changes for each player. If you have the same, then write about it in the comments to this article. You will receive 500 coins for the contents of the safe, as you complete the contract.
Code to Dr. Galvani's safe
On the ground floor of the bank's courtyard, where the guard walks around and there is a light wall, there is a work area for bank employees with numerous tables. In this area there is a separate office located directly behind the storage shaft, in which on the table you will find a note "Announcement to Employees about Dr. Galvani." This note will contain a key clue to the digital combination from Galvani's safe - this is the most important date in his life. You can find out what this date is from the book “Memoirs of Doctor Galvani,” which quite often comes across in Upper Kyria. It indicates the date - the 28th of the cold month. Considering that the cold month is the 7th, the code for the safe is 287. In Dr. Galvani's safe you will find 3 gold bars, which equals 450 coins.

Safes in a bank vault
On the task “Bank Robbery” you need to rob a bank vault, for which you only need to gain access to it, and you already have the keys for the required safe, found in the previous mission. But there are still safes in the vault that can be opened. To begin with, your assignment requires you to infiltrate the storage control center and move the storage elevator to the director’s office on the third floor or to the archive on the minus first floor. Next, you need a vault key. You will find it in Dolores Michaels' hiding place, in her office. It is hidden behind a huge painting and is opened by a button located on the desk. It lies next to the amulet.

To open all the vault safes, you need to set a 15-digit code, and all safes will open at the same time. You can find the first part of the sequence of numbers in the back room on the third floor of the main part of the bank, that is, the one you came to initially, not the courtyard. The clue is written on the board. It follows from it that each subsequent number is the sum of the previous two, but do not forget that there are 6 safes, which means the sequence must be 18 digits, three of which we must skip, since the 4th safe is opened with keys. We have 9 digits for the first three safes: 0, 1, 1, 2, 3, 5, 8, 13, and continue them for the rest: 21, 34, 55, 89, 1(44) - we won’t need the last two digits . As a result, we get the following codes for the bank vault safes:
- 1 safe: 011
- 2 safe: 235
- 3 safe: 813
- 4 safe: opens with keys (skip 3 digits)
- 5 safe: 455
- 6 safe: 891

Now the safes are open and all their contents are yours. What will you find in them:
- 1 safe belongs to Jindosh, who created the sentry soldiers, inside you will find a note with a voice code that allows you to subdue the sentry soldiers.
- 2nd safe: 30 coins and a black amulet. Where to find the rest of the amulets, read here.
- 3 safe: 150 coins
- 5 safe: 90 coins
- 6 safe: 60 coins.
Mission 5 "There's a Hole in the World"
Safe Malchiodi
Malchiodi's room is located in the Northern Shindeyri Mine in the residential section, which is located just before you enter the library. The room is locked, so you can get there only after you penetrate into the Abyss through the Eye of the Dead God. The first thing you will see in the Abyss will be the corpse of Malchiodi, from whom you must take the key to his room.
I like 15
- General information .
- Achievements . Questions - answers .
Wine Quarter
Dishonored Walkthrough. Bottle Street

We walk along the coast. There will be only one guard and a city girl. We need to avoid meeting only with security guards; ordinary city residents do not react to us in any way. When the guard is in a dark place, we strangle him from behind and drag his body away so that the girl does not find him.
In front of us we see a high bridge, and on it two guards are throwing plague corpses into the water. The bridge leads to the tower on the right, and on the tower itself there is a bone amulet. There is no way to get into the tower via the bridge. We jump into the water, swim around the tower, on the other side we find a hanging chain, along it from the water we climb onto the ledge of the tower, take bone amulet (1/5), 100 coins and the book “Death in the Month of Songs”. We return to the coast.

From the coast we climb a small flight of stairs and find ourselves on a city street. We go along the street to the right until it reaches a dead end. Here we climb up the boards to the second floor on the right, in the house we find a crazy old woman nicknamed Granny Rags. She gives us the task of dealing with three bandits who are standing at her closed front door. We collect everything useful in the house, including a couple of sleeping darts.
Vetosha's task. We go up to the second floor, take an empty bottle on the floor, throw it down to distract the bandits. When the bandits start walking around and looking for the source of the noise, we shoot them with sleeping darts. We go down and drag all the bodies into a dark alley. The task is completed, we return to Vetosha, she gives us a rune (1/7) and the next task “Poison the potions of the bandits.” We return to the first floor to the door where Rags stood. We open the door with the key, go inside, go to the end, and take another rune (2/7) on the pedestal. Let's leave this house.
We return to the entrance to the city from the coast, where the first wall of light stands. There are different ways to cross the wall of light (all methods will be indicated in the game hint). It is best to quietly climb onto the boxes standing to the right of the wall of light, and from them onto the roof. Then, through the pipes, we reach the balcony on the left, enter the balcony doors, and find ourselves with Dr. Galvani.
Dr. Galvani's office
Dishonored Walkthrough. Dr. Galvani's offices

We need to hide in other people's houses, even from ordinary people. Here on the right we see a safe. We go into the room on the right, using the magic of “possession” we get into the mouse, in its body we run through a hole in the far wall, we find ourselves in the kitchen on the ground floor. In the room to the left of the kitchen there are hanging key to Galvani's storage room And Galvani's laboratory key. There are two guards in the central room, and another in the next room. We put them to sleep one by one from behind, and drag them into a narrow room on the right. On the table we find Galvani building key.
We go up the stairs. On the 2nd floor, the guard is talking to the maid. Using the “transition” magic, we teleport to the upper staircase, so that we won’t be noticed, we go up to the 3rd floor. Here we search the entire floor and enter Galvani’s laboratory. On the bookshelf next to the globe we move the book, this will cause the entire shelf to move to the side, and a secret room will open to us. We pick up inside plague mouse body.
After this, the guard from the 2nd floor will go upstairs. We put him to sleep. We go downstairs and put the remaining maid to sleep. Now you can safely search the entire 2nd floor. Open the safe using the code " 287 "(this code is in Dr. Galvani's personal diary). We leave the house the same way - through the balcony.
Clevering Boulevard

From Dr. Galvani's balcony we move through the pipes to the opposite roof. Along the roof we find ourselves in an alley on the right. Using transfer magic, we move along the tubes, climb into a room on the 2nd floor, and then on the 3rd floor in the opposite house. Below we see two bandits guarding doors boarded up with boards. They react poorly to thrown objects and do not want to disperse. Therefore, using “transfer” we go down into the gateway behind them, approach from behind, strangle first one, then the other, drag the bodies into a dark alley. We break the boards with blows of the blade and free the man. This is the merchant Griff the Mechant, you can buy potions, ammunition and drawings of improvements "Lens Magnification 2" and "Sokolov's Formula". Inside we climb to the 2nd floor, take bone amulet (2/5). We go out into the street, go straight into the alley, go into the door leading to the old Dunwall distillery.
Old Distillery
Dishonored Walkthrough. Dunwall Whiskey Brewery
At the very beginning, we look up and use “transfer” magic to climb onto the pipe under the ceiling. We go forward to the tank, go down near it. Under the canopy, when no one is there, we collect all the food and universal distillery key. We return upstairs to the pipes and reach the end. We jump down, go into the blue doors, collect useful things. We wait for the guards to move further away, after which we run from the blue door to the next door and find ourselves in the distillery building.
Dunwall Distillery(Dunwall Distillery)
We go forward, go into the room on the right. We turn the valve on the wall, this will open a door to the right of the valve, quickly run through it. We take useful things, climb up the boxes, and jump back into the room with the valve.
We look forward, we see the distillery workshop, there are many bandits in it. But we just need to get into the nearest door on the right. To do this, it is best to move into a rat, in its body we run to two barrels, next to the door. Here we turn back into a person, enter the door and close it behind us.
Let's go forward, jump over the trap with a tripwire using "transfer" magic. We strangle the only guard and take his body under the stairs. Under the stairs we find a moonshine still, on which the bandits dilute Sokolov’s potions. Add poison into this device (additional task completed). We go up the stairs, turn on the heart and see that another bone amulet is located high above our heads, on a wooden beam. Using “transfer” we climb onto an inclined pipe, from it we are transferred to one of the side barrels, and from there to a wooden beam. We take it away bone amulet (3/5).
We go down and return the same way. We open the door to the main workshop of the distillery, move into a rat, and in its body we run up the stairs to the entrance doors. We go out into the street, through the pipes we leave the distillery quarter.
We return to the house of Staraya Vetosha, for the completed task we receive another rune (3/7).
Clevering Boulevard
Dishonored Walkthrough. Clavering Street
We go outside, climb onto the roofs where we were already, next to Dr. Galvani’s balcony. We see in front of us a large area, closed on both sides by walls of light, in its center there is a black carriage, several guards walk around. We don’t have to get to the square itself; we can go around it along the sidewalk on the right, which is separated from the square by a fence.
Having walked around the square, we find ourselves in an alley, where on one side there is a spotlight, and on the other, a flock of plague-ridden rats is running around. We go towards the spotlight to the end of the alley, turn right onto the stairs. There are two bandits ahead. To get around them, we teleport behind the boxes, and then behind the house in front.
We go out to the next square, but smaller. Here in the blue observation booth we find and take the confiscated rune (4/7). There is only one guard walking around the area, he is easy to neutralize. You can find valuables on the roof of the carriage. Having walked around the entire area, we go into the doors leading to the next location.
Holger area
Dishonored Walkthrough. Holdger Plaza
We silently approach the guard and put him to sleep. We press the lever on the left to free the captive Martin. After that, we climb onto the boxes on the right and climb over the locked gate. There are three guards walking below, one by one we strangle them and drag their bodies away. We go into the passage room and exit on the other side.
We teleport forward to the stairs going down. We climb into the pipe, pass along it under the entire area, and get out on the other side.

Kennel
Dishonored Walkthrough. Kennels

We enter the room, we see many cells and one guard. We teleport to the pipes above the cells and move forward along them. We jump down when the first guard is behind. (You can find valuable items in cell "A", but before that you need to put all the guards and nearby wolfhounds in the cells to sleep). On the table we find a note about the password to the door. We go into the corridor on the right and put the lone guard to sleep. In the cage adjacent to the cage of the sick wolfhound, we find a lever, take it, insert it into the “F” connector on the wall, next to two more levers. We press this lever “F”, do not touch the others. We enter a cage where the corpses of two people lie. We collect coins here and read the book “Seven Prohibitions.” Let's approach doors with combination lock, dial code 217 (we found it from a note and a book of sins). In a pile with dead wolfhounds we find several potions and valuable items. We leave this location through another distant door.
Office of the High Overseer
Dishonored Walkthrough. Overseer Compound
Campbell's secret room(Campbell's Bat-Cave)
From the kennel we find ourselves in the basement of the house. We approach the statue in front, click on its eye, this will open a secret door. Inside there are many useful things, a rune (5/7) and painting “Isometric of High Overseer Campbell”. We leave the secret, go up the stairs to the main hall.

Office of the High Overseer(Overseer Compound)
We stun the nearest guard and drag him to the basement. We go up the stairs to the second floor. We stun a couple more guards. We climb up onto the pipes. We go into the Archives room, steal from one of the guards interrogation room key. We pass through the Archives and enter the Interrogation Room. Upstairs, in a small room above the Interrogation Room lies brand, let's take him. Through the pipes above the ceiling we return back to the corridor of the second floor, through the same pipes we make our way to the center, to the room of the supreme caretaker.

High Overseer's Room(Meeting Room)
You need to act quickly here, the High Overseer and the Captain will soon enter here. We jump down, take the rune (6/7) on the wall above the fireplace, click on one of the glasses on the table, choose what to do with them. You can simply swap the glasses so that the caretaker gets poisoned with his own poison. But the most peaceful option is to break both glasses, so no one will get poisoned.
The High Overseer and the Captain enter, see that the glasses are broken, and move on. At this time we go down, stun the captain, then Campbell.
Achievement "Bodyguard". Together with the stunned captain, we climb out of the caretaker’s room through the window and move along the parapet to the right. We teleport down, put the captain’s body in a trash can marked “Safe Place” (additional task completed).
We return to the building. We take Campbell's body (if you don't put Campbell and the captain to sleep, he will run away and hide in his secret room) and take him to the interrogation room. Carefully! There are new guards in the room! You can throw the High Overseer, stun the guards, hide them, then carry the Overseer further. We seat Kembel in a chair in the Interrogation Room and apply the brand. After this, he will remain alive, but will be expelled from his position (task completed).
Now you can return to the Supreme Overseer’s room, collect the remaining things, go to the back room where the Overseer came out, there is a particularly valuable item there.
After that, we climb out the window onto the street, onto the cornice of the second floor. We move to the right to the “Safe Place” landmark that appears. We jump down and go through the door leading to the next location.
Backyard
Dishonored Walkthrough. Backyard

In front of us we see a guard, and two more warriors below next to the girl. Two warriors fight among themselves, and the third only watches. We stun the observer and throw his body into the trash can. We wait for the man to defeat the guard, then we approach the remaining man and woman. For our help, they give us code 203 for the nearest safe.
PlayingDishonored, you will constantly end up in locations where there are safes. They often contain something useful, such as quest items or weapons. But to open them, you need to know the password.
Finding it is not very difficult, but if you go through the location inattentively, you can miss the hint. Usually it is located not far from the safe itself. The combination consists of 3 digits, so if the player does not know the code, it will not be difficult to pick it up. However, you can do it even simpler and just find out where the hint or the password itself is in our article.
Safes in the game
There are ten safes in total in the game. Like the previous part, all safes are closely related to missions. While completing tasks, they can be hacked or simply opened if there is a code. There are no safes in the missions “Lady Boyle's Last Reception”, “Loyalists” and “Guiding Beacon”, so you don’t even have to look for them.
Safe in the mission "Innocently Convicted"
Number of safes: 1
Location: Dunwall catacombs
Safe code: 451
The first mission has very little valuable loot, so you can focus on finding the safe. You will not find any runes, amulets, or paintings by Sokolov in the catacombs - there are only rats, empty bottles and other rubbish. The loyalists left equipment at the location that can be found if you look around carefully. Near the next checkpoint there is a grate, behind which there is a safe. Unlike other safes, this one will just lie on the floor. The combination is nearby, on a shelf with bottles. It is enough to clear the shelf so that you can see the combination written in chalk.

Number of safes: 3
Safe No. 1
Location: Dr. Galvani's office
Safe code: 287
To get to the safe we need to go to Clevering Boulevard. Having reached the first wall, we look for the good doctor’s office. On the second floor, in a room with folding doors, there is a safe. The combination is located on the third floor in Dr. Galvani's office. As with the previous safe, the combination is written in chalk on a board with drawings and various tabs. The player will find gold in the safe.

Safe No. 2
Location: Kennels of the High Overseer
Safe code: 217
We take the same road as in the case of Campbell's hiding place. We go through the main hall on the first floor and, having reached the partition, turn left. The road leads straight to the kennels. If you look carefully, near the building we will find a note with a code, on which three phrases will be scrawled:
- "Lying Tongue"
- “Wandering Eye”
- “Abstract Mind”
This is a hint where each of the deadly sins means a certain number, and all three make up our code for the safe. All sins are listed in the book. It lies right at the entrance to the main hall. We correlate the sins with numbers and enter the code, it’s not difficult. The supplies that we can get by using the code are in the cage with the dead werewolves. To get into this area, you need to go through the opening, turn left and move straight until you hit the crematorium door.

Safe No. 3
Location: High Overseer Security Barracks
Safe code: 203
This is the last safe in the mission and it is located right in the security barracks. We need to be careful, because rangers with wolfhounds are constantly walking around, which pose a very great danger to us. In order not to miss the barracks, you can navigate by the door to the workshop - the entrance to these barracks is located directly opposite it. Also nearby was the rune we were looking for earlier. To find out the code, we go to the backyard, where we see that the guard’s sister was attacked by guards, accusing the girl of witchcraft. Having gotten rid of all the enemies, the brother and sister will tell our hero the code to the safe. The safe contains darts and an elixir.
There is another option for obtaining the cipher. To do this, we need to go to the dining room. There will be a letter with the changed code on the table. The note is very easy to find - there will be a pear on it.

Safes in mission: "House of Delights"
Number of safes: 1
Safe code: 879, 138, 656, 679 or 696
Location: house of an art dealer in the Wine Quarter
In the third mission there is only one safe. To get the code, we need to go straight to the Golden Cat establishment. An art dealer will be waiting for us in the room with the electric chair. After communicating with him in various ways (including a switch that helps to get the necessary information), we find out the information we need. Then we go to the merchant's house. Having risen to the third floor, we find ourselves in the safe room.
Here you can find a rune, a painting of Sokolov, and a lot of other useful loot. Slackjov also really wants to know this combination, who will promise to organize the disappearance of the Pendleton brothers for it. Here you can cheat and completely clean out the safe before handing over the code to the bandit, receiving a reward from him as well.

Safes in mission: "Royal Physician"
Number of safes: 2
Safe No. 1
Location: Pratchett's house
Safe code: 473
We go to Pratchett's house. You can get into the building in different ways, the most common one is to kill all the guards or move into one of the guards. But it will still be safer to take a detour. Then you need to take a closer look at the paintings that are on the second and third floors. Each of them will have a specific number written on it:
- Painting with city streets – 4
- Painting with a whaling – 3.
- Painting with a whaling ship – 7.
The safe itself must be found on the top floor. We have the numbers, but we still need to find out their correct sequence. In general, you can pick it up randomly, trying different combinations. To speed up the process, you can read the letter that is located next to the safe. It contains the correct sequence. It will be written there: streets, ship, whaling. Having solved this problem, we go to the safe and open it. We take the gold and rune.

Safe No. 2
Location: dilapidated house
Safe code: 294
We go to Sokolov's house, but only on the northern side of the road. There we find a collapsed house and several captive people who are locked behind a wall of light. They beg you to free them, and if we fulfill their request, they will tell you the combination to the safe. It is located nearby, behind the painting, on the top floor. Using one of our abilities, we get to the safe and take gold bars from it. It's hard to get past this safe, so getting a reward is guaranteed.

Safes in mission: "Return to the Tower"
Number of safes: 1
Safe code: 935
Location: Lord Regent's chambers in the Tower
For those who complete the game without a single kill, it is imperative to find and open this safe. The combination from him is not issued by the lord himself, but by a propaganda officer. He is quite easy to find, since he broadcasts to the entire Dunwall from his radio room, which is located at the very top of the tower. How to get into it?
Having climbed the main staircase, we turn right and go up to the broadcasting station. Along the way we will meet a messenger, and if we spare him and do not kill him, he will give access codes to the necessary safe, as well as other useful information regarding the contents of the cache. In his safe, the lord hides an audio recording that testifies to his evil crimes and atrocities.
It is enough to turn it on throughout the entire city, and not a trace will remain of the regent’s reputation. The lord's room is located on the third floor, not far from the two main staircases. As soon as we turn on the recording, we get the “Political Suicide” achievement. The Regent will be arrested and sent to the galleys as soon as the recording is made public.

Safes in mission: "Flooded Quarter"
Number of safes: 2
Safe No. 1
Location: flooded apartment in central Rudshore
Safe code: 428
The most difficult safe in the game. First we need to find the cipher itself. Information about him is indicated in a letter, which is located in a dilapidated house on the top floor. Location: Radshore Market. The landmarks are spitting plants, as well as the balcony on which we previously looked for one of Sokolov’s paintings. Having received a letter with a code, we go to the lair of the assassins. Not far from their lair, killers will be waiting for us, after dealing with them we will teleport to the corner of the roof of the house.
Having climbed up, we inspect the lower left sector, then jump there and open the back door. Afterwards we go down to the water and swim from the door to the left. Having sailed a decent distance, we find the treasured safe. It will contain a figurine of a whale.

Safe No. 2
Location: catacombs of the Old Port
Safe code: 528
We walk along the main road and don’t turn anywhere. On the way we will meet spitting plants. The first ones can be easily bypassed from below, and the second ones just need to be shot (those near which there is a bathtub and several dead bodies lie). There will be a stone staircase on the left. We climb up it and find a clue containing a code. The note will tell you about the month of wind, the month of seeds and the month of ice. There will be a decoder next to the note. The problem is very easy to solve, so there will be no difficulties opening the safe. A bone amulet awaits us in the cache.

List of cipher codes
| Safe Code | Mission name | Location |
|---|---|---|
| 4-5-1 | Dishonored \ Dishonored | Safe in the sewer, near where Corvo gets his ammunition back |
| 2-8-7 | Safe in Dr. Galvani's house | |
| 2-1-7 | High Overseer Campbell \ High Overseer Campbell | Door in Taskmaster's base |
| 2-0-3 | High Overseer Campbell \ High Overseer Campbell | Safe in the barracks of the Overseer's base |
| 8-7-9 1-3-8 6-5-6 6-7-9 6-9-6 | House of Pleasure \ House of Pleasure | Safe at the artist's residence (always a different combination) |
| 4-7-3 | Safe in Pratchett's house | |
| 2-9-4 | The Royal Physician \ Court Doctor | Safe behind the painting in a destroyed building, next to Sokolov's property |
| 9-3-5 | Return to the Tower \ Return to the tower | Lord Regent's safe, in his apartments |
| 4-2-8 | Safe underwater, at the beginning of Central Rudshore | |
| 5-2-8 | Flooded District \ Flooded District | Safe with bone amulet |
Bottom line
As mentioned earlier, there are a total of 10 safes in the game. The fifth, sixth, eighth and tenth can be considered really useful. The most useful one is the one in which we find an audio recording, since in fact this safe can be considered a plot safe. The rest can be opened at will; they do not provide any particular advantage in the game.
There are ten combination locks in Dishonored - on nine safes and one door. Below you will find codes for each, as well as tips on where to find them.
MISSION #1. INNOCENTLY CONVICTED
Number of safes - 1.
Safe No. 01.
Location: Dunwall catacombs
Combination: 451
How to get it: This safe is perhaps the only thing of interest you can find during the first mission. There you will find no runes, no amulets, no paintings by Sokolov. Just rats, empty bottles and expired canned goods. After you find the equipment left for Corvo by the Loyalists, look around. Behind the bars immediately after the save point is a safe. Well... rather, it's lying on the floor. Behind the safe there are shelves with bottles, and if you remove them, you can see the combination drawn in chalk. In the safe, however, there is nothing particularly interesting, but it’s still nice.
MISSION #2. SUPREME WATCHER
Number of safes - 3.
Safe No. 02.
Location: Dr. Galvani's office
Combination: 287
How to get it: we go to Clevering Boulevard and after the first wall of light we find the good doctor’s office. The safe is located on the second floor, in a room with folding glass doors, but the combination to it can be found in Dr. Galvani's office on the third floor. The code is written in chalk on one of the boards with drawings and other displays. There is gold waiting for us in the safe.
Safe No. 03.
Location: High Overseer's Kennels
Combination: 217
How to get: Remember how we stormed Campbell's hiding place? We take the same road again: we pass the main hall on the first floor and turn into the door to the left of the partition, it leads to the kennels. In the kennels in front of the first doorway there is a note that says a code, namely: "lying tongue", "wandering eye" and "absent-minded mind". Each of these sins has its own number, and they are all listed in the book at the entrance to the main hall. We correlate the sins with numbers and get a code. After that, go through the opening, turn left and go all the way until you hit the crematorium door. The cage with the dead wolfhounds contains your supplies.
Safe No. 04.
Location: High Overseer Security Barracks
Combination: 203
How to get: The last safe in this mission is in the security barracks. Friends with masks and kind wolfhounds on a leash are still walking nearby. For reference: the entrance to the barracks is located exactly opposite the door to the workshop (we also looked for the rune there, remember?). It is quite interesting to obtain the code combination. To do this, go from Holger Square to the backyard and, nearby in the alley, save the caretaker’s sister, accused of witchcraft, from reprisals by the guards. To celebrate, the brother and sister will tell you the code to the safe with wishes for successful plunder of the territories. In the safe you will find ammunition, including darts and an elixir. Another option to get hold of a code is to go to the canteen. The letter about changing the code will lie on the table, crushed, it seems, by a pear. We don’t get fired, gentlemen guards, well, we don’t get fired even once!
MISSION #3. HOUSE OF PLEASURES
Number of safes - 1.
Safe No. 05.
Location: house of an art dealer in the Wine Quarter
Combination: 879, 138, 656, 679 or 696
How to get it: in the third mission there is only one safe, but what a one! To get the code from him, you first need to go to the “Golden Cat” and there, in a room with a sort of electric chair, have a good conversation with the art dealer. After the switch knocks out the desired combination from this masochist, go to the merchant’s house and go up to the third floor. The dealer is a good guy, he has a safe - that's a whole room! A lot of tasty things await you there, for example, a rune, a painting by Sokolov and a bunch of other little things. By the way, Slackjov will really want to know the combination to this safe (and, by the way, will promise for it the disappearance of the Pendleton brothers without a trace). The most cunning ones, however, clean out the safe, and then go to feed the poor bandit with the treasured numbers. Comedians..
MISSION #4. ROYAL DOCTOR
Number of safes - 2.
Safe No. 06.
Location: Pratchett's house
Combination: 473
How to get it: once you get to Pratchett’s house (how you do this is up to you: you can kill the guards, move into them, or, like a real hero, bypass them altogether), find paintings on the first, second and third floors. Each of them will have a number on it. In a painting with city streets there will be 4, in a painting with a whaling - 3, and 7 - in a painting with a whaling ship. The safe is located on the third floor, and the sequence you need is encrypted in the letter next to it: streets, ship, whaling. Putting two and two together, we go to take the safe. Gold bars and a rune await us there.
Safe No. 07.
Location: dilapidated house
Combination: 294
How to get: On the north side, on the way to Sokolov's house, you will find a ruined house and several prisoners who are locked behind a wall of light. If you heed their requests and free them, they will tell you the combination to the safe. The safe is located here, behind the painting on the third floor. Using Transfer, get to it and receive your gold bars as a prize. There is nothing complicated here, you definitely won’t miss it.
MISSION #6. RETURN TO THE TOWER
Number of safes - 1.
Safe No. 08.
Location: Lord Regent's chambers in the Tower
Combination: 935
How to get it: If you plan to complete the game without a single corpse, you simply need this safe. The combination you are looking for, however, will be given to you not by the lord himself (alas!), but by a propaganda officer who broadcasts to all of Dunwall from his radio room at the very top of the tower. That's where I recommend starting. From the main stairs, turn right twice and go up to the broadcasting station. If you spare the contact, he will share with you not only the access code for the safe, but also useful information about its contents. In the safe, the Lord Regent hides an audio recording that exposes his vile essence. And if you turn it on for the whole city, there will be nothing good left from the bastard. I hope you remember where the Lord Regent's room is: on the third floor, after the main staircase and then the second, less formal staircase. Having obtained the necessary record from the Lord Regent's safe, you will receive the achievement "Political Suicide", and Comrade Hiram will be led straight to the galleys. And happiness to everyone. Apart from the Lord Regent, of course!
MISSION #7. FLOODED QUARTER
Number of safes - 2.
Safe No. 09.
Location: Flooded apartment in central Rudshore
Combination: 428
How to get: This is, in my opinion, the most difficult safe in the game. First you need to find the code for it. It is indicated in a letter that can be found on the third floor of a dilapidated house in the Rudshora market location (your guide will be cute spitting plants, as well as the balcony where you were still looking for Sokolov’s painting). Taking the letter, stomp into the killers' lair. After this, deal with Daud's first assassins not far from his lair and teleport to the corner of the roof of the house. If you look down from the roof, you need the lower left sector. We jump like a swallow, open the back door and swim down and to the left of the entrance. Luckily for us, there will still be a place to catch our breath. And then we open the treasured safe, which contains a figurine of a whale. Hooray!
Stories
Safe No. 10.
Location: catacombs of the Old Port
Combination: 528
How to get it: to get to this safe, follow your main road. Along the way you will meet two groups of spitting plants. We go around the first ones from below, and shoot the second ones (there will be a bathtub and several corpses nearby), for example, from a crossbow. After that, we go up the stone stairs on the left and there we find a hint about the month of wind, the month of seeds and the month of ice. Nearby, which is convenient, there is a decoder book. We break the safe and enjoy life. By the way, there’s not just anything waiting for us there, but a bone amulet!
DLC: "The Knife of Dunwall"
Combination: 943, 775, 763, 187, 876, 937, 588
The first safe of this DLC can be found in the whaling yard. To get to it, you need to find a balcony that faces the sea, under it there is a man in a boat. There you will find the treasured safe.
Location: Rothwild Whaler.
Combination: 876, 512.
The second safe is located in the same location. You will need to make your way past 2-3 guards to Rothwild's office. There should be either a bone amulet or a rune waiting for you (I don’t remember).
This guide will tell you in detail how to open all the safes (and more) in the game Dishonored.
Exercise: Innocently Convicted.
Location: Catacombs of Dunwall.
Code: 451.
Next to the safe, on a small table you can find a note with the following content:

After reading this note, we understand that we need to look for whiskey, and just to the right of the safe there is a small cabinet, the middle shelf of which is lined with bottles of whiskey, immediately behind them our combination is written

Exercise: Supreme Overseer.
Location: Dr. Galvani's office. (2nd floor).
Code: 287.
We rise from the second floor to the third and see this board:

As you can see, the doctor decided to write down the code for the safe in case he forgets it, I think this is the best place to write down the code for safes with gold bars

Exercise: Supreme Overseer.
Location: The High Overseer's Kennels.
Code: 217.
It’s more likely not a safe, but a secret room with various useful things :)
As soon as you enter the kennel you can find a room like this:

As you can see, there is a note on the bed with the following content:


After we placed and lowered the found lever, we opened the room:


After this, we substitute the prohibitions from the first note with the prohibition numbers from the book and get our combination - 217.

Exercise: Supreme Overseer.
Location: Backyard. (Security barracks).
Code: 203.
The code for this safe will be given to you by the caretaker, whose sister was accused of witchcraft by other caretakers; when you help him, he will tell you the code as a sign of gratitude:

Also, if you suddenly failed to save the caretaker and his sister, if you are attentive enough, you will notice a note that lies under the bed next to our safe:


Exercise: House of pleasures.
Location: Art dealer's house.
Code: 879, 138, 656, 679 or 696.
First, we find the painting dealer himself in the Golden Cat, and with the help of the electric chair we find out the treasured code from him:

Let me tell you right away: the combinations for this safe may vary.

Exercise: Royal physician.
Location: Pratchett's house.
Code: 473.
Next to the safe, namely on the table, we will find a note with this text:

In it, Pratchett says he hints to us that the code to the safe is kept by the paintings...
On the first floor of his house we will find a painting:

On the second:

On the third:

By combining all the numbers from the pictures in the order named by Pratchatt, we will get a combination.

Exercise: Royal physician.
Location: North side of Kaldwin Bridge.
Code: 294.
Right under the safe you will see people trapped:

If you help them, the woman will tell you the combination to the safe as a sign of gratitude.


Exercise: Return to the Tower.
Location: Lord Regent's chambers.
Code: 935.
At the very beginning of the mission, Samuel advises us to visit the broadcasting station, where we meet a frightened citizen who immediately understands why we came here and willingly (well, maybe not) tells us the code to the safe, and in addition tells us how to overthrow Lord Regent without even meeting him .


Exercise: Flooded area.
Location:
Code: 428.

We go into the gap between the houses (in the center of the screenshot). And we see this picture:

We jump down, look for and open the door, swim into the basement.
On your way to get your equipment, you will visit these places:

I advise you to look at the corner of this block, there in a small room you will find a note with the following content:

From this note we learn the code for this safe.

Exercise: Flooded area.
Location: Catacombs of the old port.
Code: 528.


Comparing the information received, we conclude that the combination from the safe is 528.